Looking for a Teachable review? Here's the thing: while there are tons of Teachable reviews online, few of them are in-depth. This one is different. We're going to cover it all. We've created a detailed look at the platform, including videos and images. We'll also show you what we think makes Teachable worthwhile, along with a few areas we think could be improved upon. If you've been looking for an honest, quality, no-stones-left-unturned review, this is it.
Teachable review:
What is Teachable?
Teachable is an online course creation platform. It offers course creators the chance to build, market, and sell courses and coaching services through their platform. Teachable also offers additional features like memberships and comes with a course marketplace.
The Teachable Backstory
Originally created back in 2013, the first instance of the platform was called Fedora. As the story goes, Founder and CEO Ankur Nagpal had been instructing a course on marketing through another course platform. The experience was not as seamless as it could be. So, Nagpal decided to go all-in and created Teachable. Since then, the brand has blossomed. Teachable has helped over 100,000 course creators sell over $500 million in courses and the business continues to grow.
Who Teachable is Designed for
Most reviews out there like to call Teachable a tool for beginners. In our experience, this is usually to do with the look and feel of the platform, how intuitive it is, and the fact that it's just easy to use. And we think that’s accurate. Teachable is ideal for beginners but can work for intermediate course creators, too. It does what you need it to do, which is streamline the process of getting your online course live, saving you the time you would otherwise spend on coding, copywriting, marketing, selling, and everything in between.
Features
Completing in-depth reviews of various online course creation platforms is enlightening. You begin to appreciate the complexities of bringing a platform to life. And when it comes to delivering a product that over a hundred thousand customers love, the sheer number of customers is a testament to a job well done. Teachable’s collection of features and intricate details shows that the platform is truly designed for ease of use.
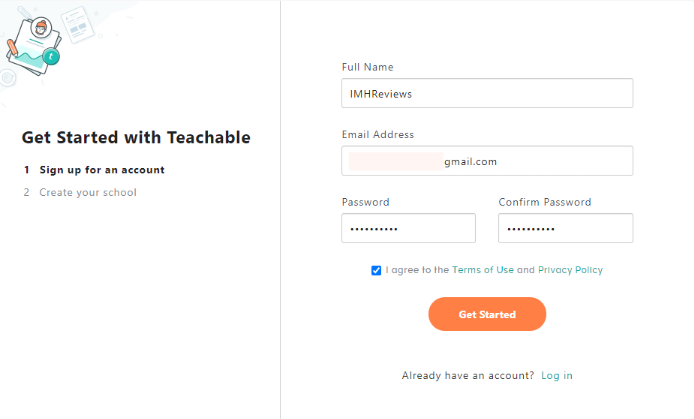
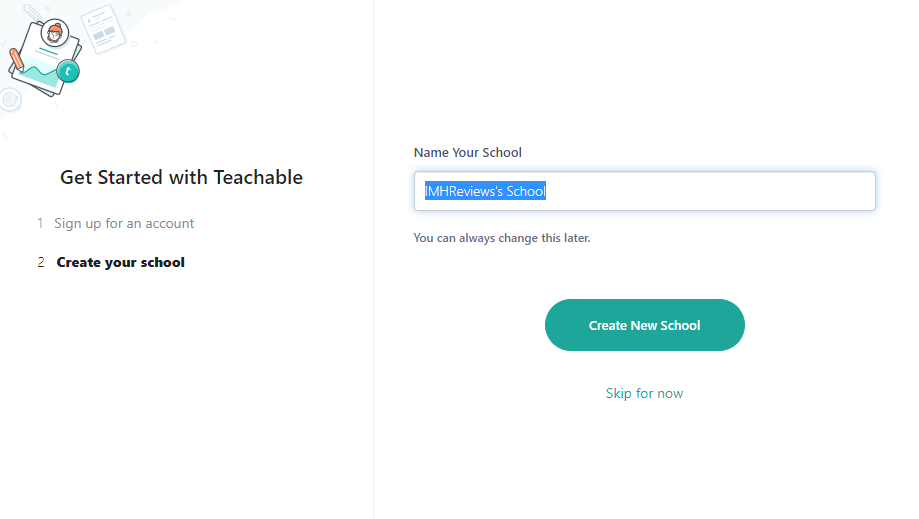
Take the sign-up process. It takes all of two steps to create an account. Best of all, if you’re not ready to commit financially, you’re not pressured to either. Teachable automatically offers a demo account for you to get started and you don't need to enter your credit card details until you’re ready to enroll students and make your site live.
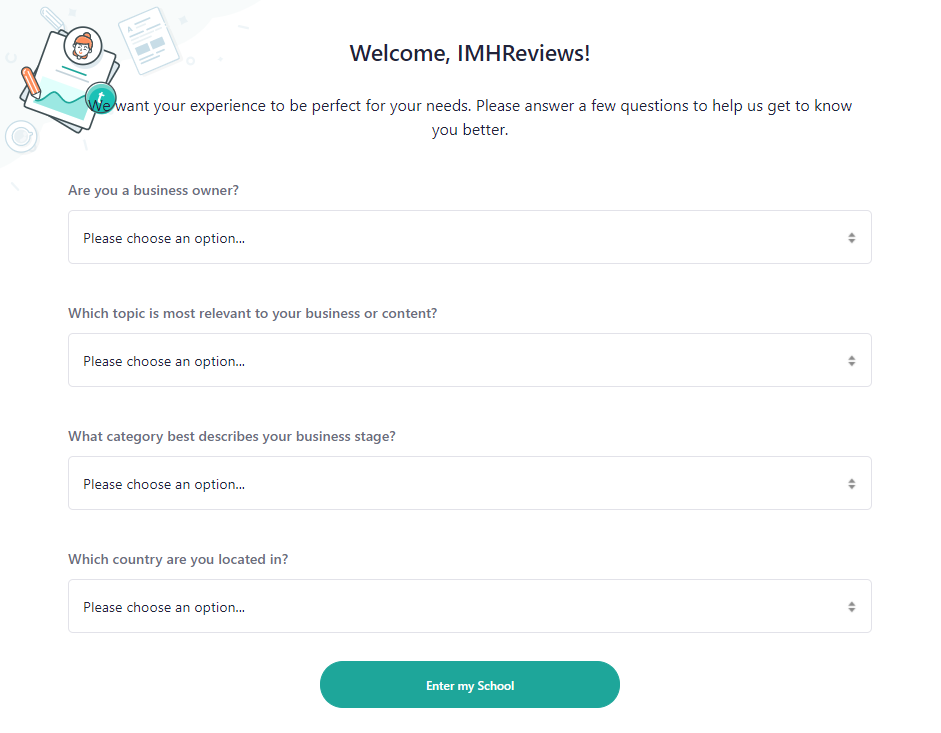
Once you’ve signed up and created your new school, Teachable, like other online course creation platforms, asks a series of on-boarding survey questions to get to know you better. Sure, these may seem a little intrusive, but they are designed to help improve the platform. And if you’re serious about creating an amazing online course that's competitive, helping the good folks over at Teachable by answering these questions is well worth it.
Here's a look at a complete list of Teachable's features.
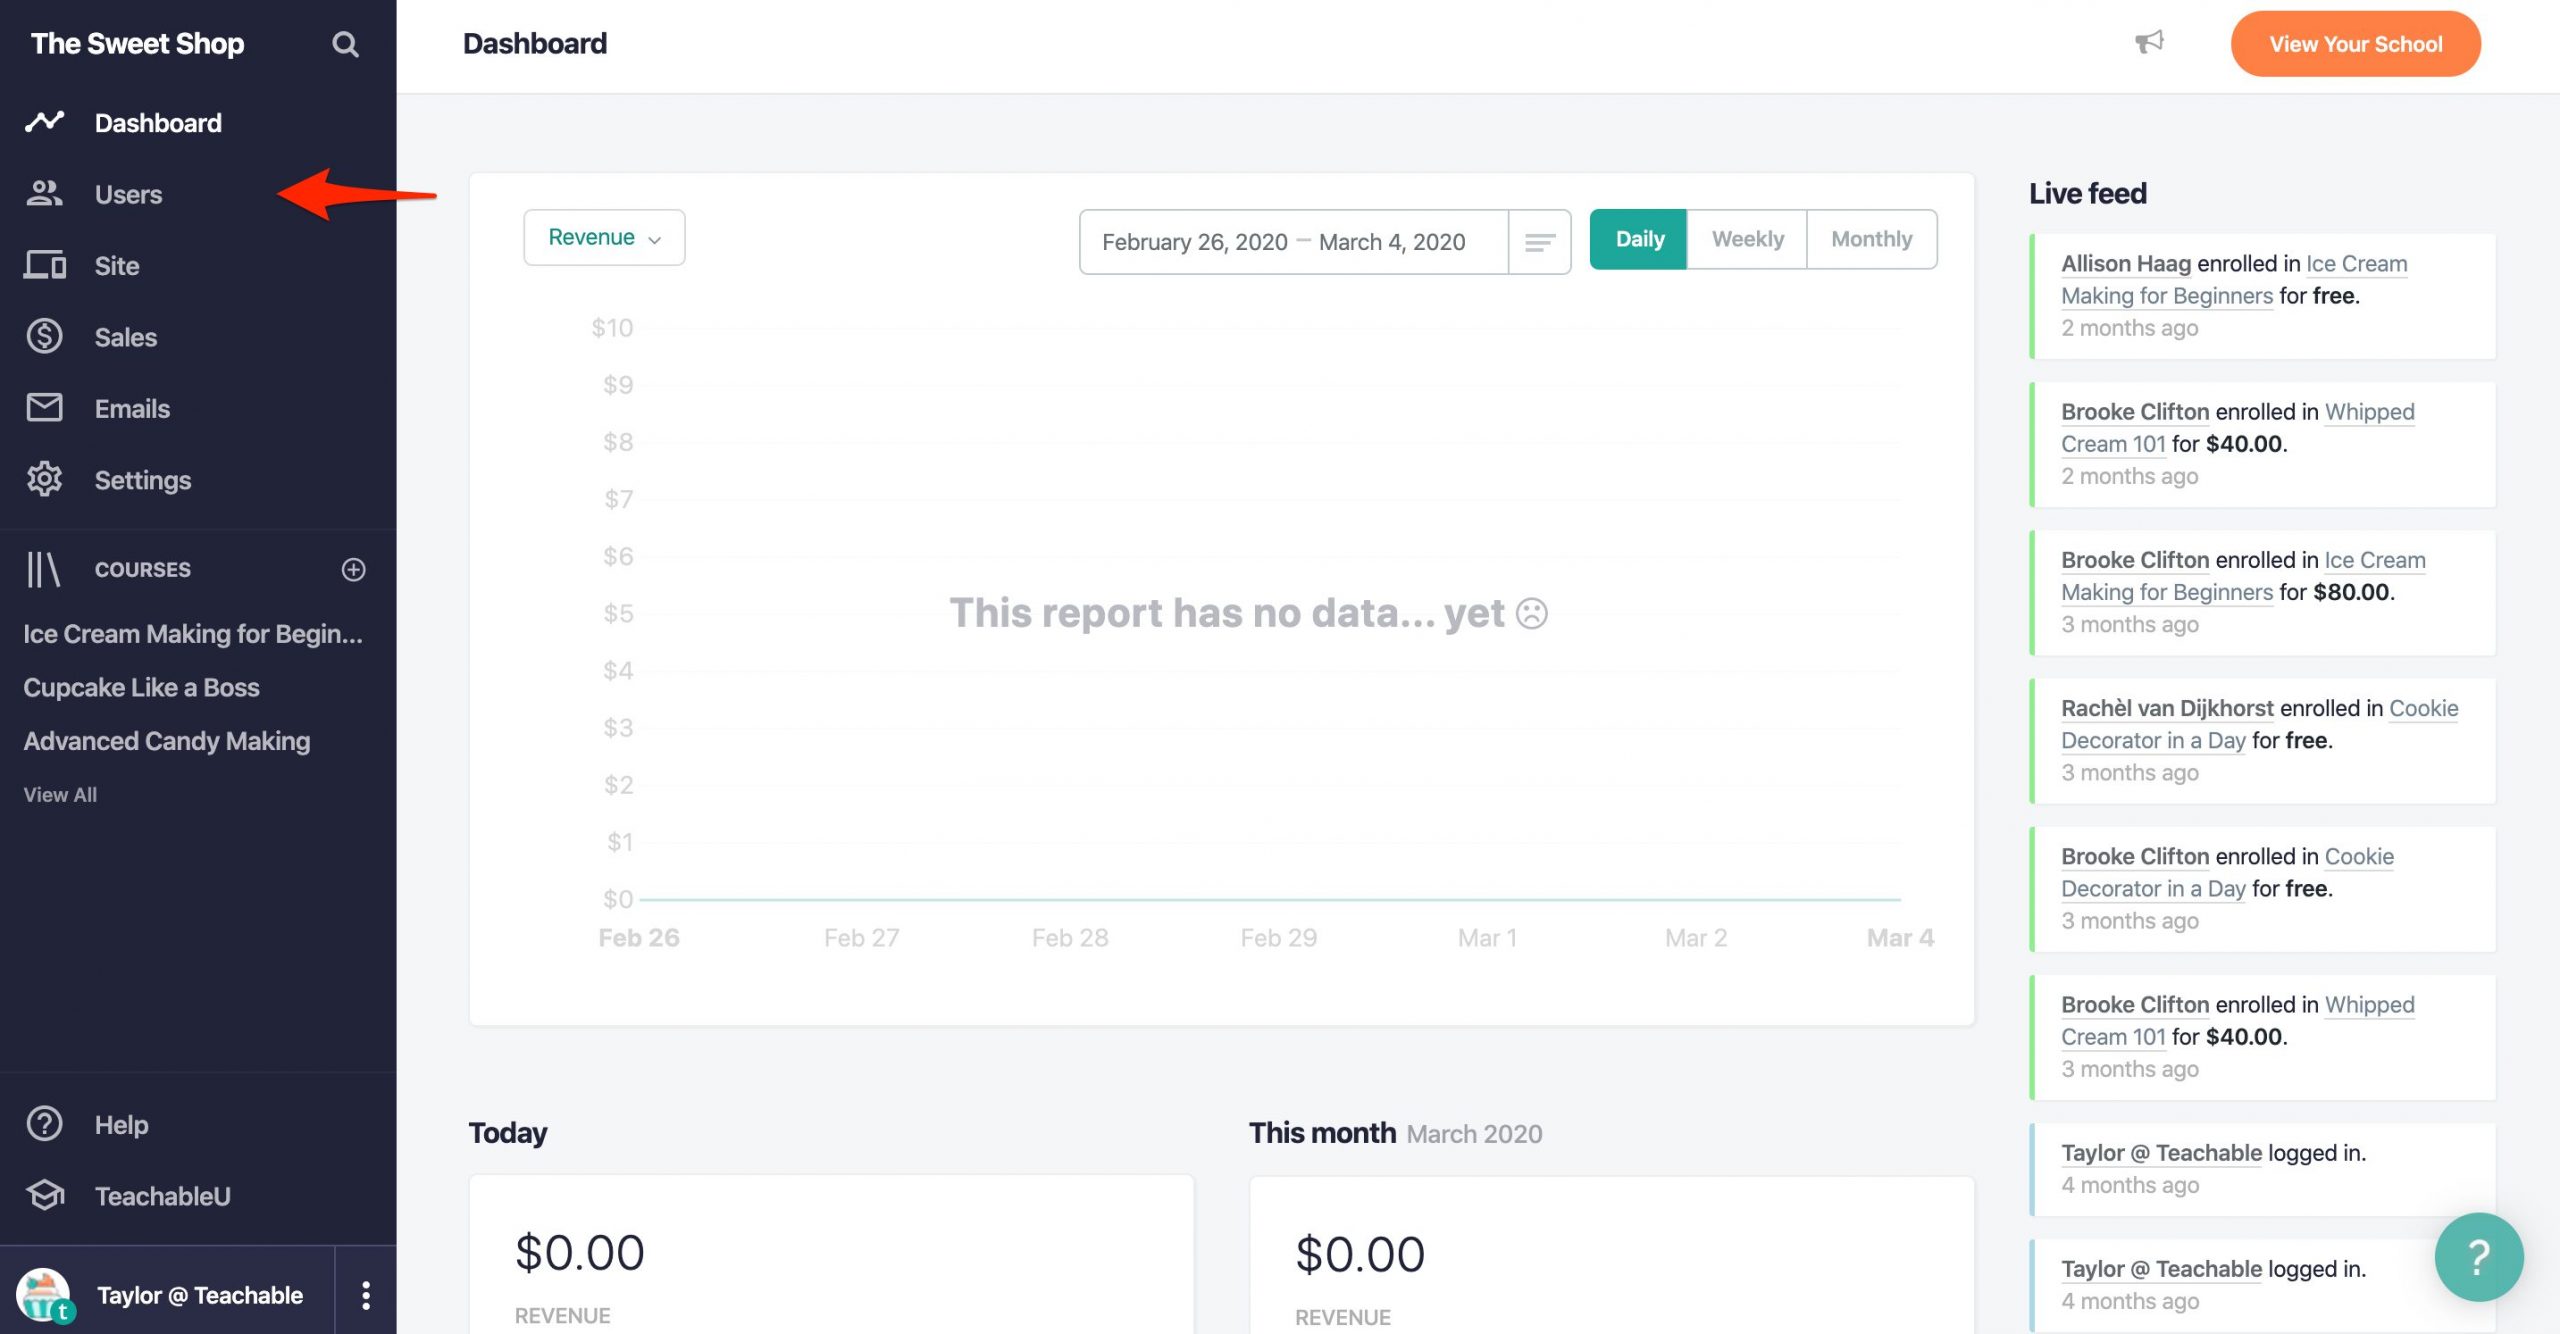
Your Dashboard
Dashboards can be tricky things to build. We like what Teachable has done. They've placed the most important elements of launching your course right in front of you. The mix of educational content and tabs that allow you to get started is a smart move.
Teachable’s dashboard is the first screen you see after completing the on-boarding questions. It shows core features you'll need to launch your course. These include signing up for a free live webinar that covers how to create an online school and first course, how to use Teachable to accept payments, and how to create a beautiful school that matches your brand’s look and feel.
You’ll also see tabs to create a product, customize the look and feel of your front-facing platform, set up your domain, and ultimately launch your school (greyed out until the above steps have been completed).
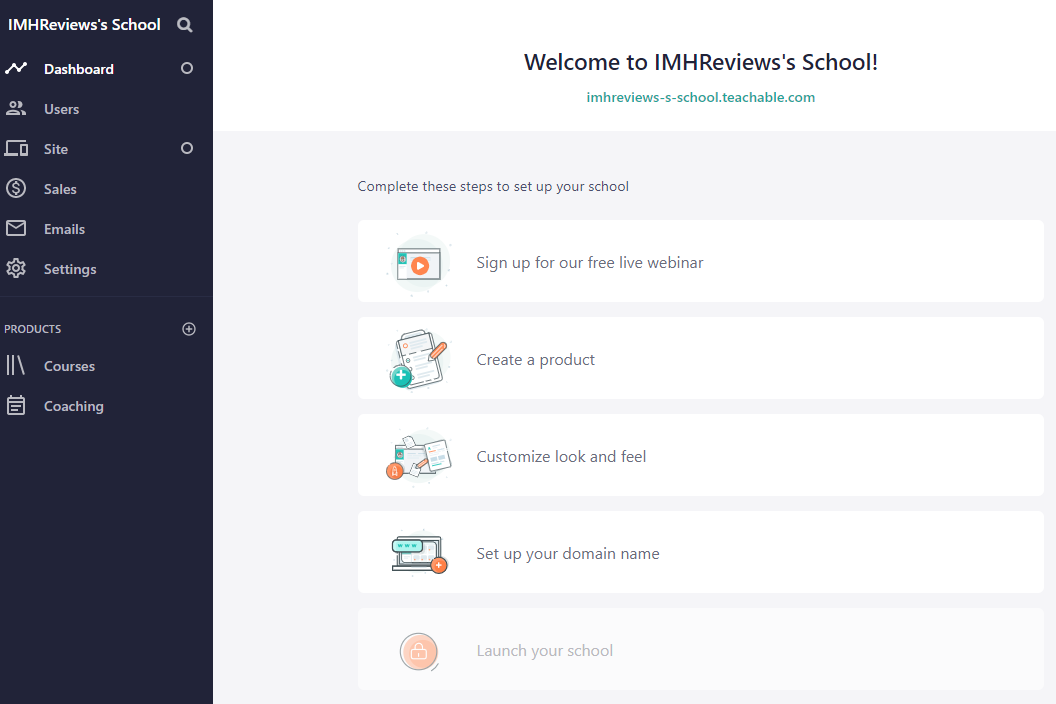
Your dashboard includes a collection of sections that you'll work in to launch your course. They are all neatly aligned in the left-hand margin for easy access.
Accessing Users
Users is where you’ll find all information related to people associated with your course. Users include students, owners, authors, affiliates, and anyone else you'd like to include. The Users section also comes with a filter and search bar to help you find people based on certain criteria. As far as filters go, Teachable’s thought of everything. While there are 33 filters available, we’ve created this shortlist is to illustrate how flexible Teachable’s filter feature is.
You can set filters by:
- Name or email address that doesn't contain a specific word or domain
- People that have signed up before and after a certain event
- Who logged in before or after the event
- Login counts greater than a certain value
- Country code
- If the contact source contains a specific value
- If a contact signed up with an affiliate code
- Who has or has not enrolled in a specific course(s)
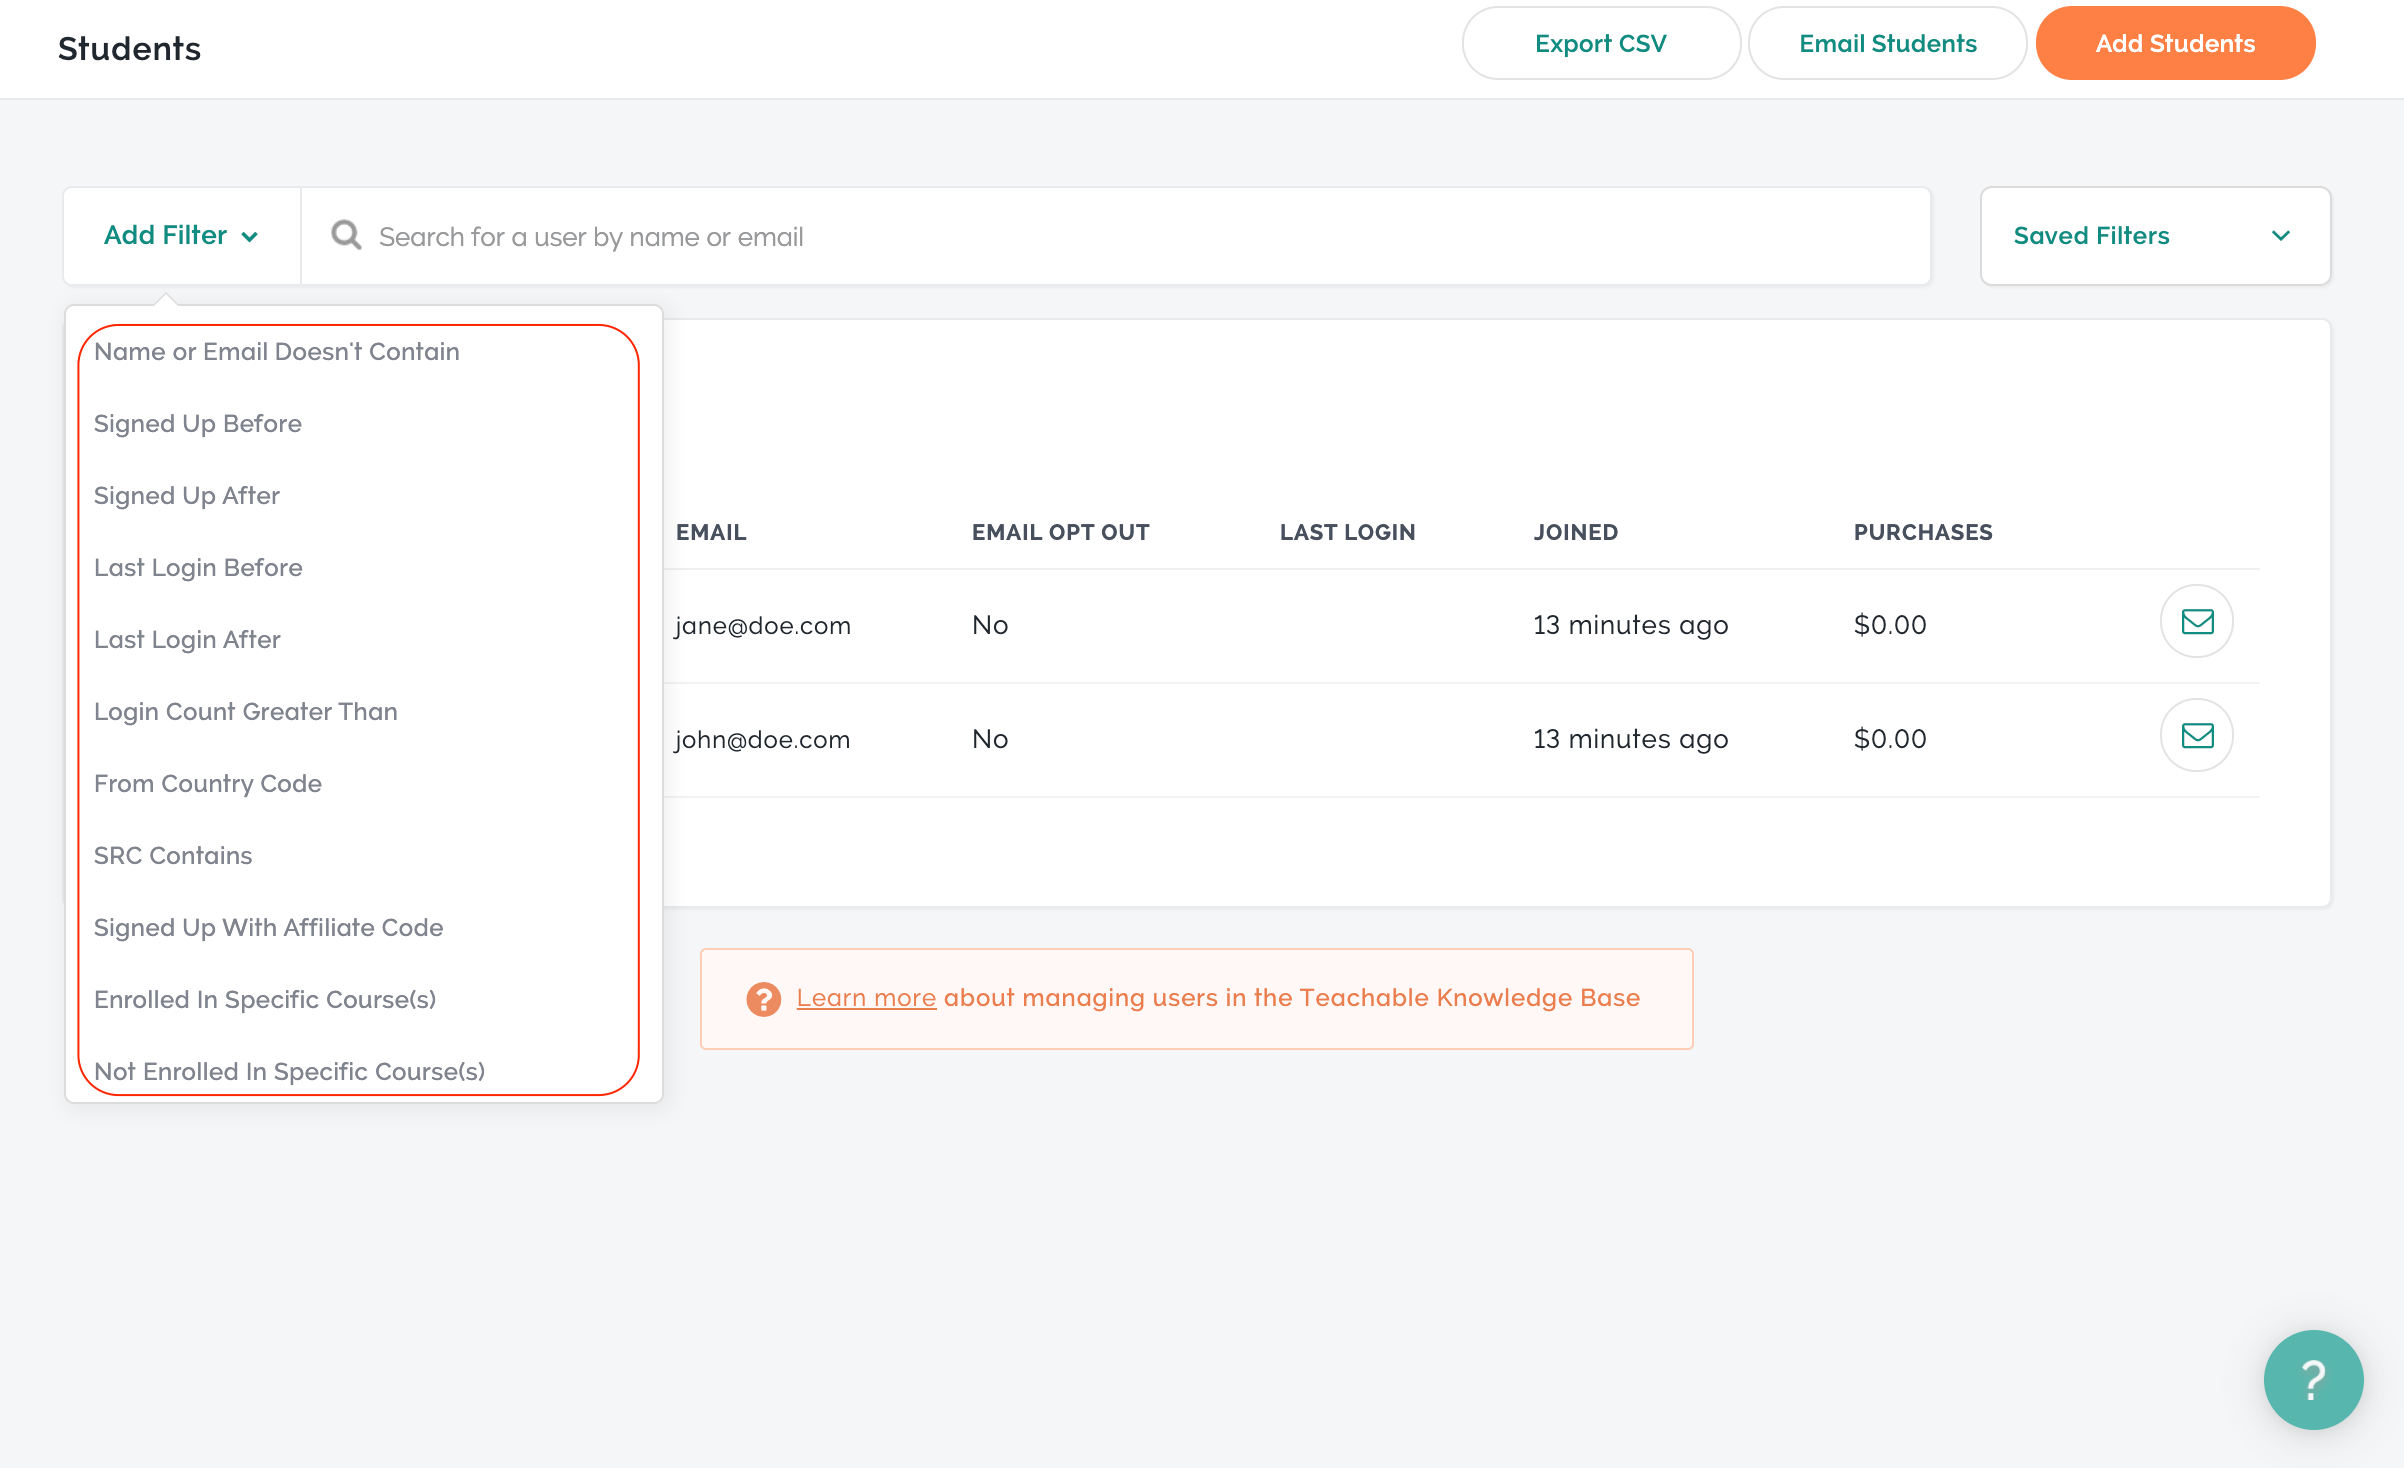
This information may sound overwhelming but it’s really easy to understand when examined. Filters help you identify opportunities for sales and marketing campaigns you can run. For example, let's say you have a new course designed for learners in the US only. Using the filter function, you can find all learners currently in your database who are located in the United States and then create an offer that you can email to them.
The Users section also includes distinct tabs for the following:
- Students for courses
- Owners who have admin rights in your account, all of which can be controlled by the primary account owner (you)
- Authors who help you create course material and have access to sales information and more
- Affiliates who promote your courses
- Custom users who are given unique permissions to manage content in your account (note: this ability is only available for Teachable Business Plan clients).
The Users section also allows you to add students manually or export your contacts in a CSV file if you'd like to further analyze this information or use it in a third-party platform.
Site
Like the creation of your course, building your site is just as important. The Site section is where you go to manage site design, add unique pages, and more. Here's a look at everything you can do in the Site section.
Customize Your Theme
The Theme section comes with the ability to customize the font that will appear throughout your site, colors for navigation bars, footers, navigation bar links, buttons, headings, body text, and even your video player. The Theme section also allows you to add your brand’s unique site logo, a school thumbnail (a small image to represent your school in myTeachable accounts learners use), and a favicon.
While the theme Teachable offers is flexible, customizable, and easy-to-use, we think that offering a single theme makes the platform less flexible. When contrasted to competitors like Kajabi that offers over seven site theme options, or Thinkific’s four with multiple layout options, Teachable seems to fall short.
Pages
Teachable’s Page creation solution is somewhat familiar if you’ve spent any time looking at other online course platforms. It uses page blocks that appear in the left-hand margin of your screen and a preview on the right that shows updates as you make them. While this may seem slightly rudimentary, in our experience, it seems to be the most effective way to streamline the course creation process. You don't need to fret with elements, spacing or code requirements to get stuff done.
The left-hand margin includes two tabs. The first is for content. It houses all the editable text and images that appear in the preview window. The second tab is dedicated to design elements. You can do everything from change background colors, adjust image opacity, and customize text color, size, alignment, and the padding of selected page elements.
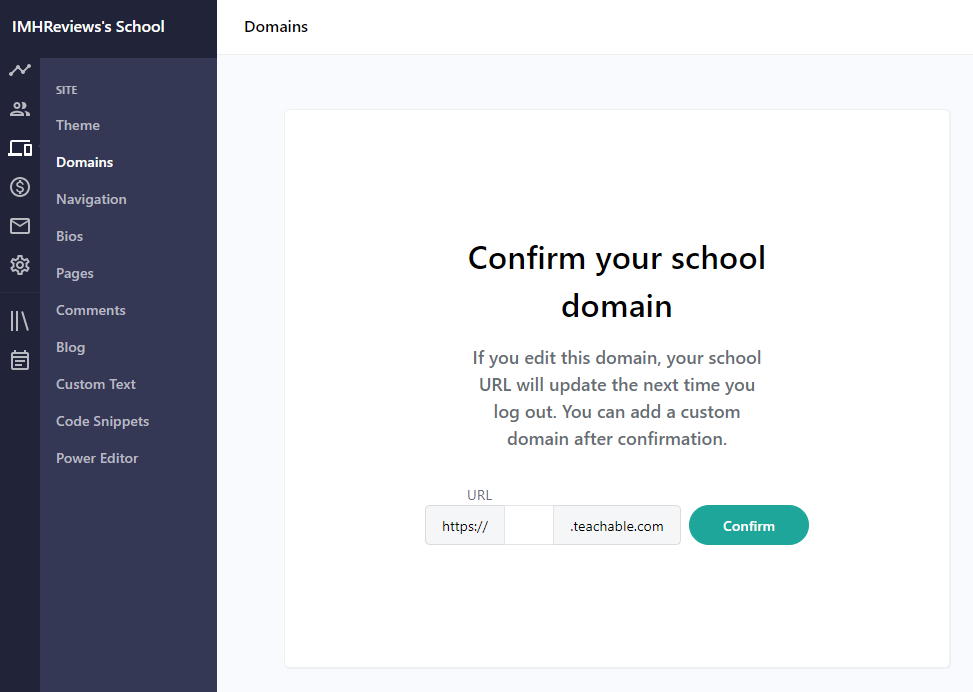
Domains
One of the easier aspects of launching your own online course is dodging the worry of hosting. Teachable supports online course creators by offering free hosting under a Teachable subdomain. You can use a custom domain and Teachable has a complete support article on how to go about accessing your hosting companies domain management panel and updating your DNS settings.
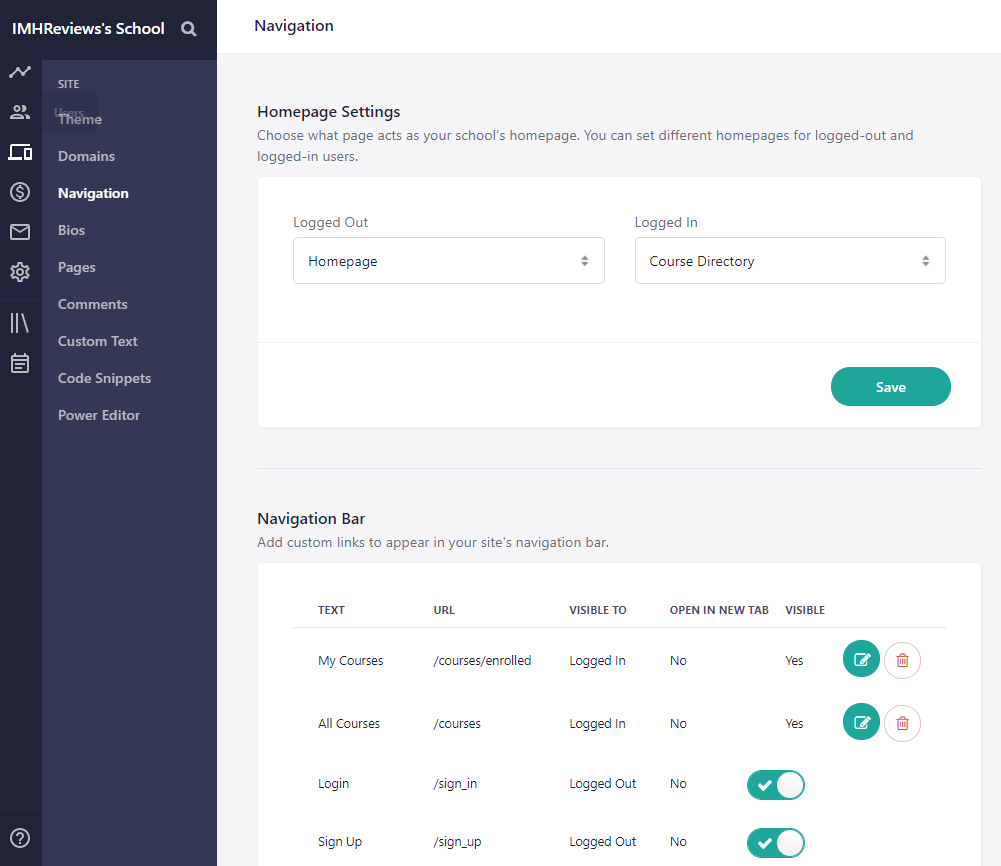
Navigation
The Navigation area under the Site section is where you'll set your website’s homepage and login pages for learners. Other areas included are the navigation bar, where you can determine which URLs associated with links in your main navigation bar. The footer module controls which links will appear in your footer.
Bios
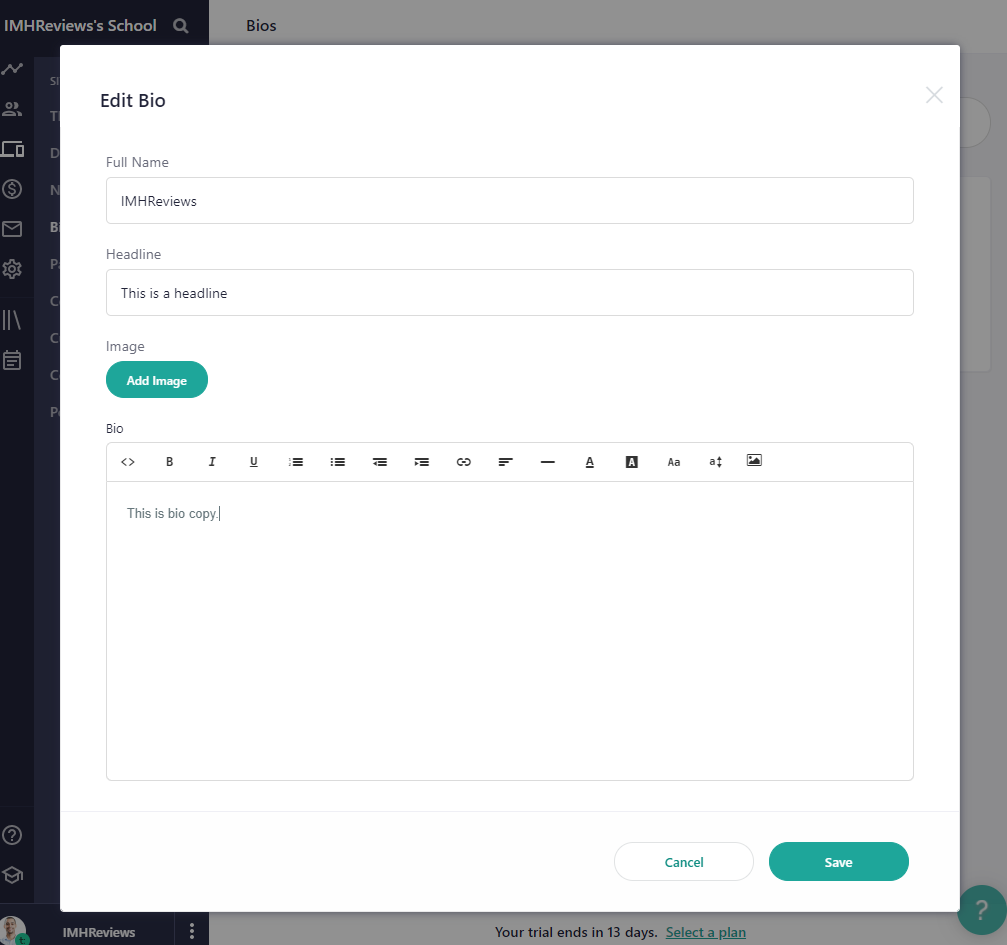
While not first thing you think of when creating your site, creating a bio is still important. Bios act as a form of proof for learners interested in your course. The more you can share about your level of expertise and why they should learn from you, the higher the probability that you sell more. Teachable's Bios section allows you to add a profile image, edit your name, include a headline and a description.
Comments
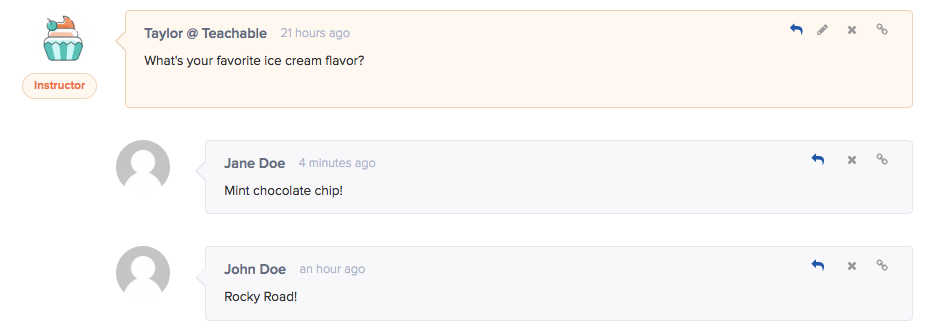
The Comments section is where you'll find all comments learners have made on your lectures. We love the fact that Teachable has made it possible to respond to comments from the comment section. While not a revolutionary idea, it makes it easy to manage engagements with learners.
Note: Comment moderation and multi-threaded responses are managed through the General Setting in the left-hand menu.
Custom Text
Custom Text may seem like overkill but it's helpful to have. This section is where you’ll find a collection of site elements or “keys'' that you can customize. A site key is a string associated with a specific function and also comes with a friendly name that you can change.
For example, the key for administrator users is “admin” and its defualt friendly name is “Admin”. You can change “Admin” in the CURRENT field to make it whatever you want. This may not seem necessary but it could prove useful when testing button text for course enrollments to see which copy converts best.
Code Snippets
While Teachable comes with everything you need to launch your course, it still leaves room for unique code. Under the Code Snippets section, you'll be able to add CSS code in various ways. Code can be applied across all pages on your site, in headers, and for logged-in logged-out learners.

Power Editor
The Power Editor is proof that Teachable is really dedicated to course creators at almost every level. It's designed using Shopify's Liquid, and open-source templating language. With it, creators can access template folders and customize lectures, course sales pages, page blocks, the way components appear on your blog, author bios, and layouts of your pages in your school. And if you get stuck, Teachable offers a growing collection of help articles to guide you through customizing your site.
Sales
Sales is where you'll track and manage everything related to the money side of your business. Sales includes these areas:
Transactions
When you start selling a course it will fill up with a collection of data. Data includes purchase dates, prices of courses purchased, what you earned (important if you offer an affiliate program), student details, the course that was purchased, and more.
Above this table breakdown, you will also see summaries in larger bold figures. These include the number of total sales you made, your total earnings, the sum of affiliate earnings, the dollar value of refunds, and any chargebacks that may have occurred.
![]()
The Transactions area also includes filter functionality. With it you can filter data by date, price, earnings, student name, course name, the payment gateway that processed a transaction, and the affiliate responsible for the course sale.
We like the idea of this level of filtering functionality. Running a successful online business is only possible if you know your numbers. Filters can be applied to sort transaction data in various ways using all fields included in the transaction area, making it easy to stay on top of your finances.
Statements
Need to draw detailed reports on transactions in your account? The Statements area is designed to give you every detail you can think of about transactions in your school. It's broken into School Earnings Statements and Individual Earnings Statements (including summaries, a transaction list, and payouts) sections.
Each of these sections allows you to drill down deeper for information on transactions. You can tell who purchased the course, how they paid, whether you've been paid for the purchase, and how much you earned over a certain period.
The Transaction List lets you get even more granular. They show sales that were processed and include details like purchase dates, the type of transaction (whether a sale, a refund, a chargeback, or failed payment).
The Payouts section shows the payout processed through Teachable
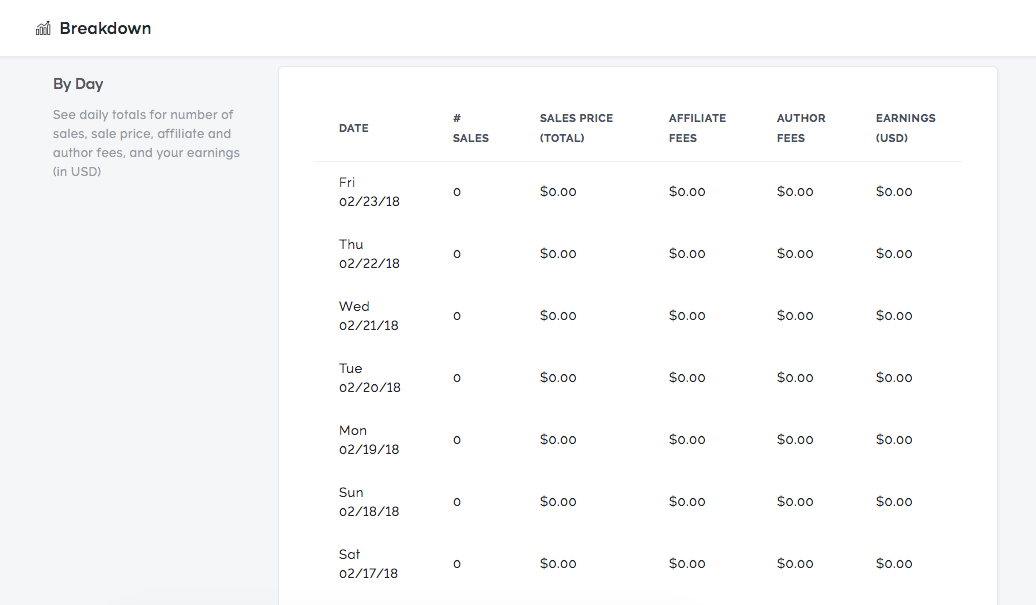
Breakdown
The Breakdown area includes a snapshot of sales by the day and month. It’s a relatively easy section to read, one that makes tracking your business performance simpler.
Upsells
Upsells is dedicated to showing a report of all the upsells completed. Upsells can be made by making an offer on the thank you page (through customizing it). The Upsells report will show a record of all upsell transactions and includes the page where the upsell offer is located, the name of the course offered as an upsell, the number of times the upsell offer was accepted and offered, the conversion rate, and the amount of revenue generated from the upsell.
While Teachable doesn't offer sophisticated pipelines or sales funnels like Kajabi, including the upsell functionality transforms a thank you page into a sales funnel. It leaves the door open for greater average sales values, which means more successful online course creators.
Emails
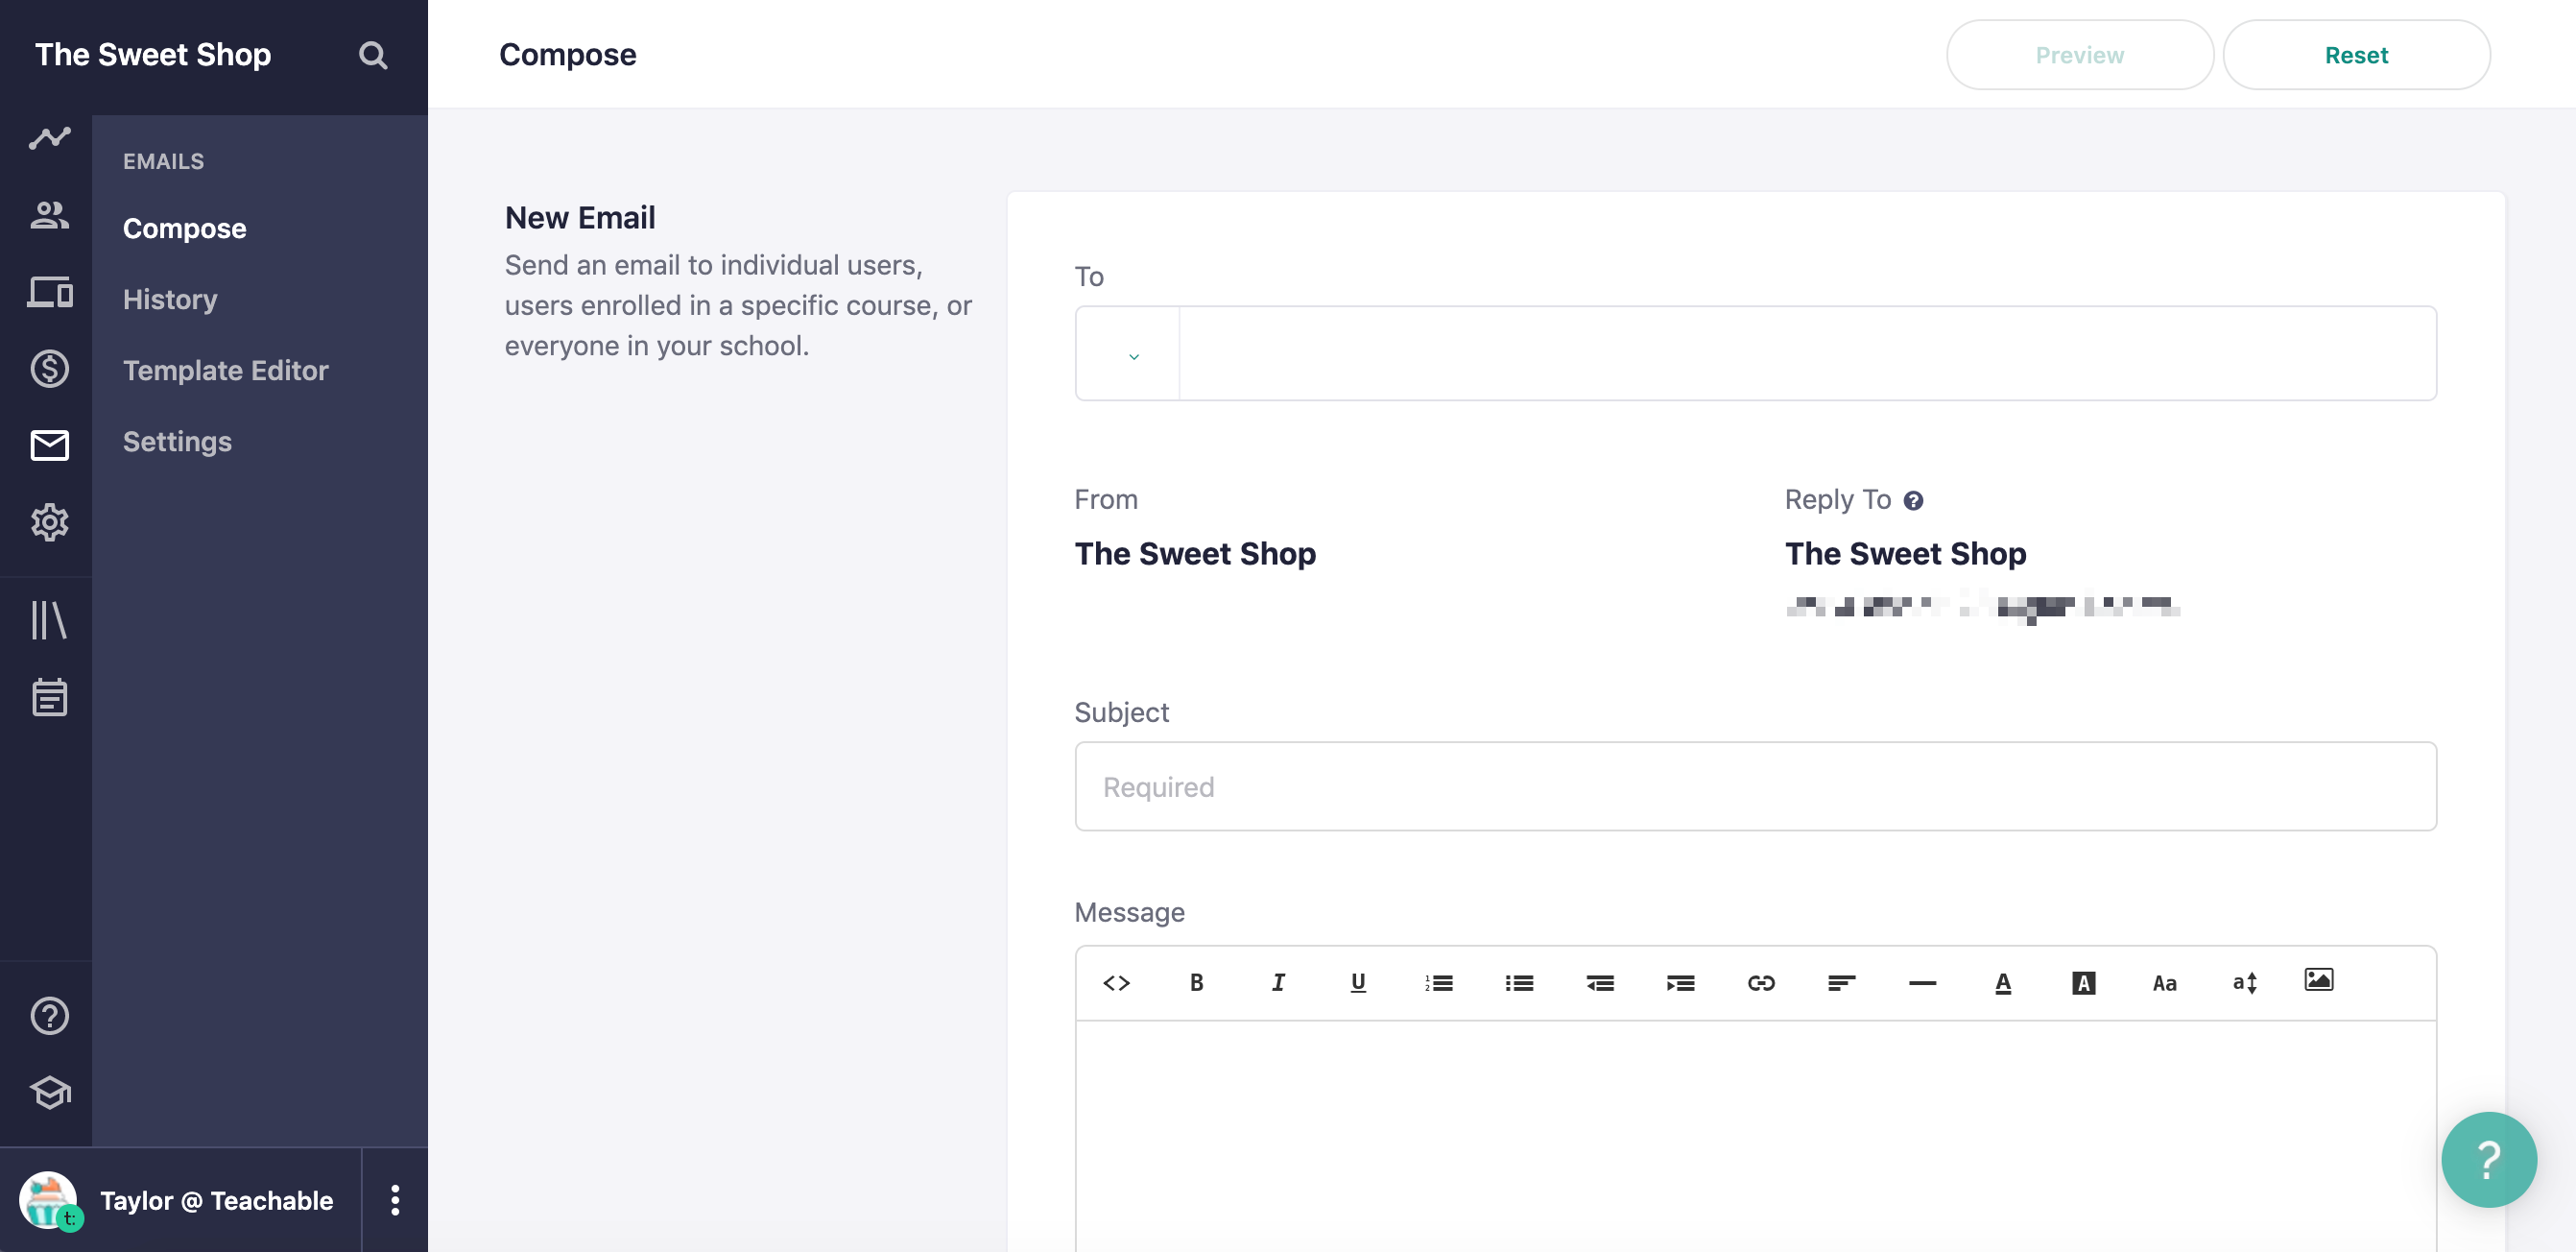
Teachable's Email feature allows you to connect with individuals, all enrollees in a course, or everyone in your school.
Compose
Using it is really simple, too. In the “to” field select which contacts you like to email, enter your subject line and proceed to fill in your message body.
As with the webpage theme builder, you're able to preview your message. Because this is an email you can send a test email before sending the real thing.
History
History shows a collection of all emails sent since your account creation date. Emails can be grouped by recipient or according to various filters. These include emails for students, authors, and owners.
Student email shows:
- Drip Content Released
- New Enrollments
- Receipts
- Automatic Course Unenrollment Notifications
- Failed Payments
- Nonpayment Cancellations
- Custom Emails
- Reset User Access
- Reset Password
- Nonpayment Subscription Cancellations
- Payment Authorizations Required
Author and owner email history includes:
- New Enrollments
- Nonpayment Cancellations
- Nonpayment Authorizations Required
- Billing Errors
- New Student Signups
- Manual Subscription Cancellations
Judging from the list of email history options, it's easy to see that Teachable tracks every bit of communication you send. This is helpful especially when you're planning email messaging or updating it for existing courses. You can tell what you've used, making it easier to elevate the quality of your messaging, but also use the history should you need to manage any disputes related to your course or requests that learners may feel were never sent.
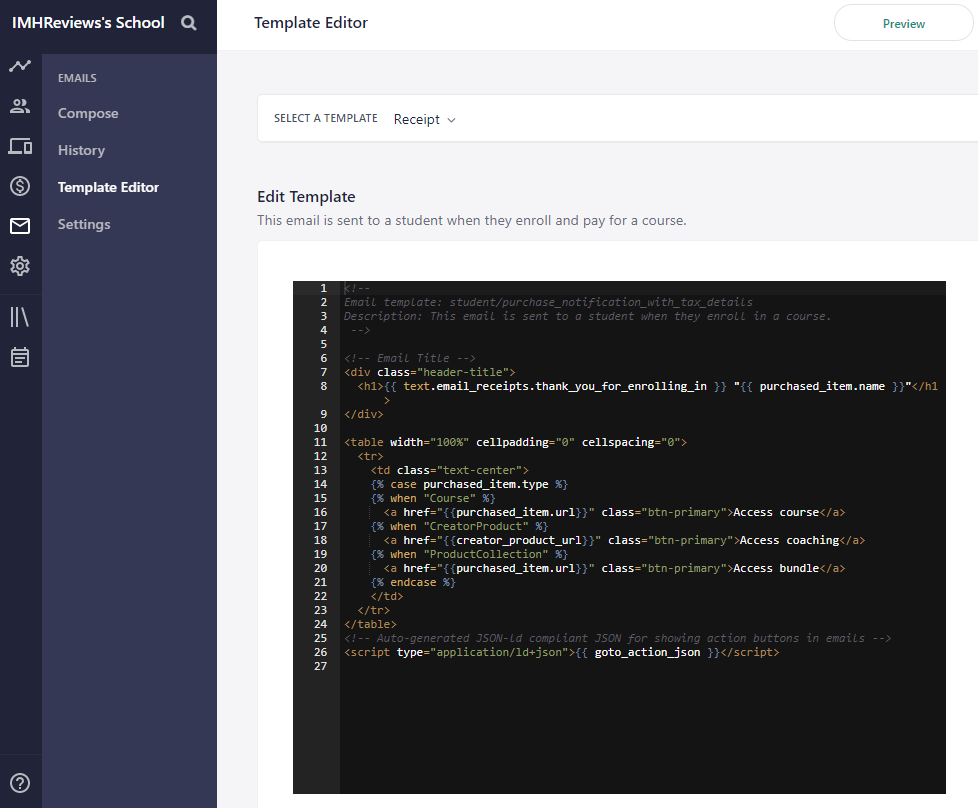
Template Editor
Using the template editor will require some coding knowledge. It’s built with HTML and CSS, so be sure you know what you're doing before you start editing any fields. The editor also comes with a preview feature.
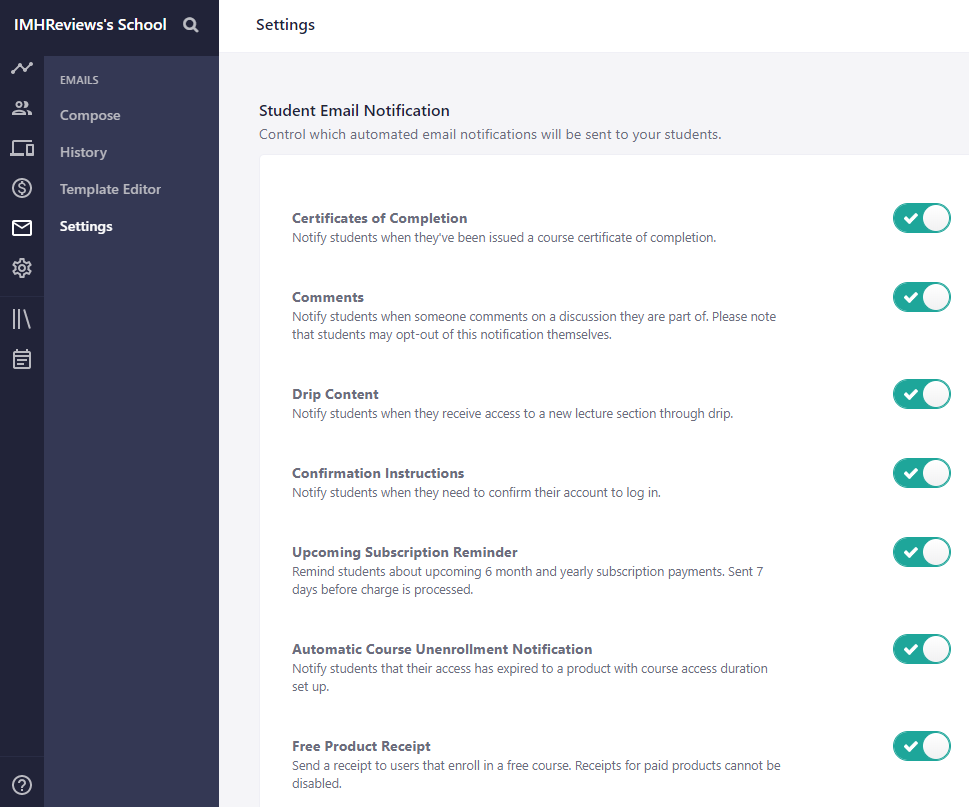
Settings
The Settings section allows you to control which automated email notifications make it to students. You'll find inviting toggle activation buttons and these are activated by default. Automated notifications are available for certificates of completion, comments (notify students when someone comments on a discussion they are part of), drip content, confirmation instructions, upcoming subscription reminders, automated course unenrollment notifications, and free product receipts.
General Settings
The General settings section is where you'll get to manage more of the admin side of your online course business. It includes:
General
A general area to update your address, business name, homepage heading and description, and the reply to email address and from name. You can also use this area to set author permissions which control everything from allowing authors to publish courses to customizing course sales pages, and whether they are allowed to issue certificates to students in courses.
Payments and Getting Paid With Teachable
The Payments section is where you'll set up your payment gateway to the paid. If you're based in the US, Canada or the UK, processing of your payments is handled through Teachable Payments. Teachable payments are handled by Stripe Express and this allows you to receive payments on a daily, weekly or monthly basis via your Stripe Express account.
If you're not based in the US, Canada or the UK, your payments will be subject to the monthly payment gateway. All course payments will still be processed by Teachable's stripe account but you will only receive a payout every 30 days via PayPal.
While this may seem like a major drawback, this appears to be a technicality that Teachable is unable to circumvent. We've seen similar delays on other platforms, too, albeit for different reasons. On Udemy, for example, payouts are made 30 days after the purchase. This is done to manage any refund requests.
Student Payments
While course creators are limited to receiving payments via PayPal and Stripe, students have multiple options for purchasing courses. They can use credit or debit cards, PayPal, Apple Pay, and Google Pay.
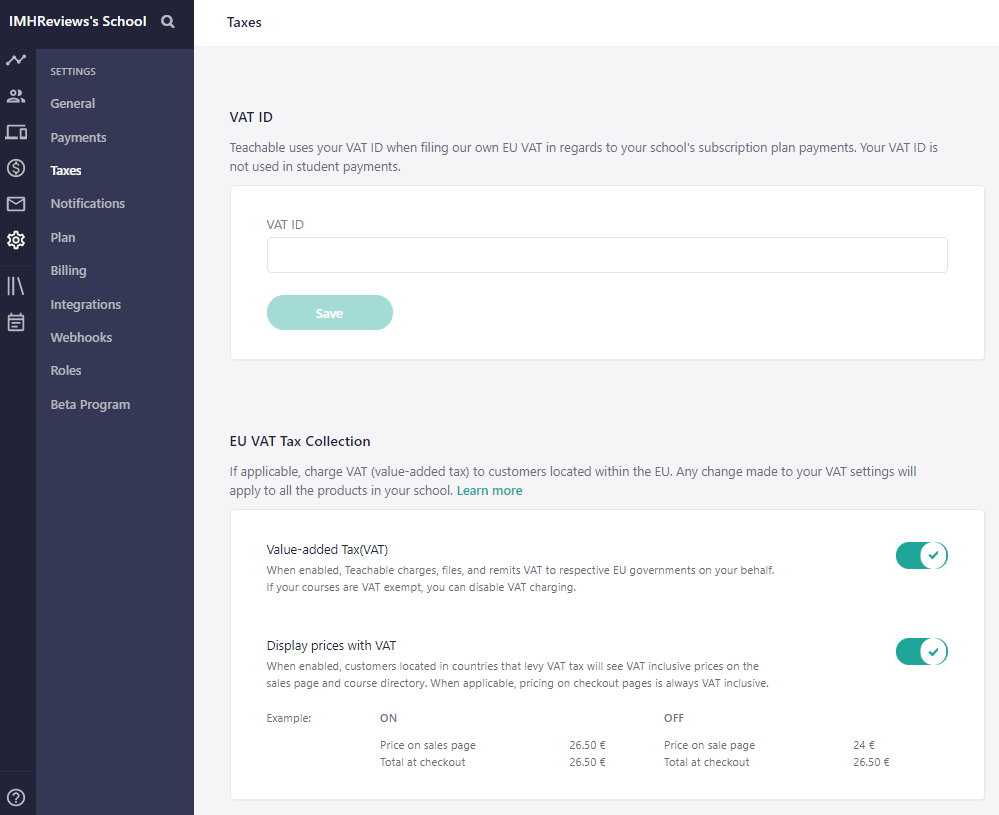
Managing Taxes
Tax isn't the most exciting aspect of running a business but it is important. To help, Teachable has a section dedicated to helping you collect tax for each course sold. Depending on where you're based you will have to abide by tax rules for your country. Teachable offers a support article on VAT and how it's calculated when purchases are made.
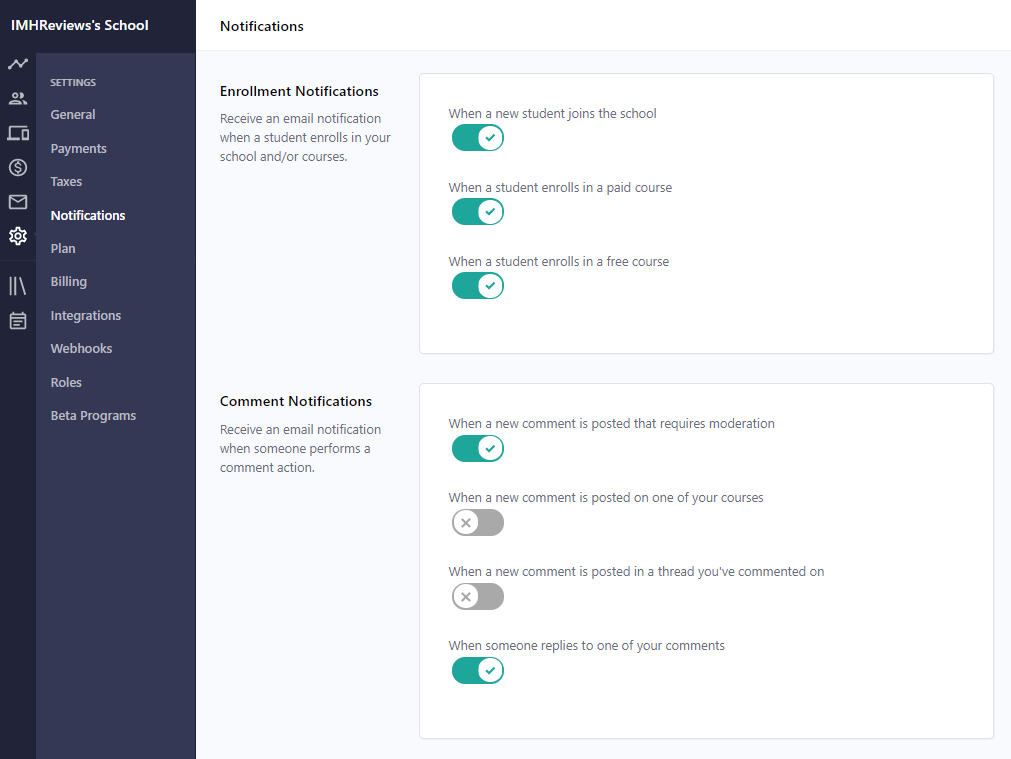
Notifications
The Notifications settings section is where you’ll control enrollment and common notifications. You can choose to be notified when a new student joins your school, enrolled for a course, leaves a comment, or when someone replies to your comments on a thread.
And this is pretty helpful considering how large course enrollments can become. You may not want to be notified every time someone comments in a thread you once commented on.
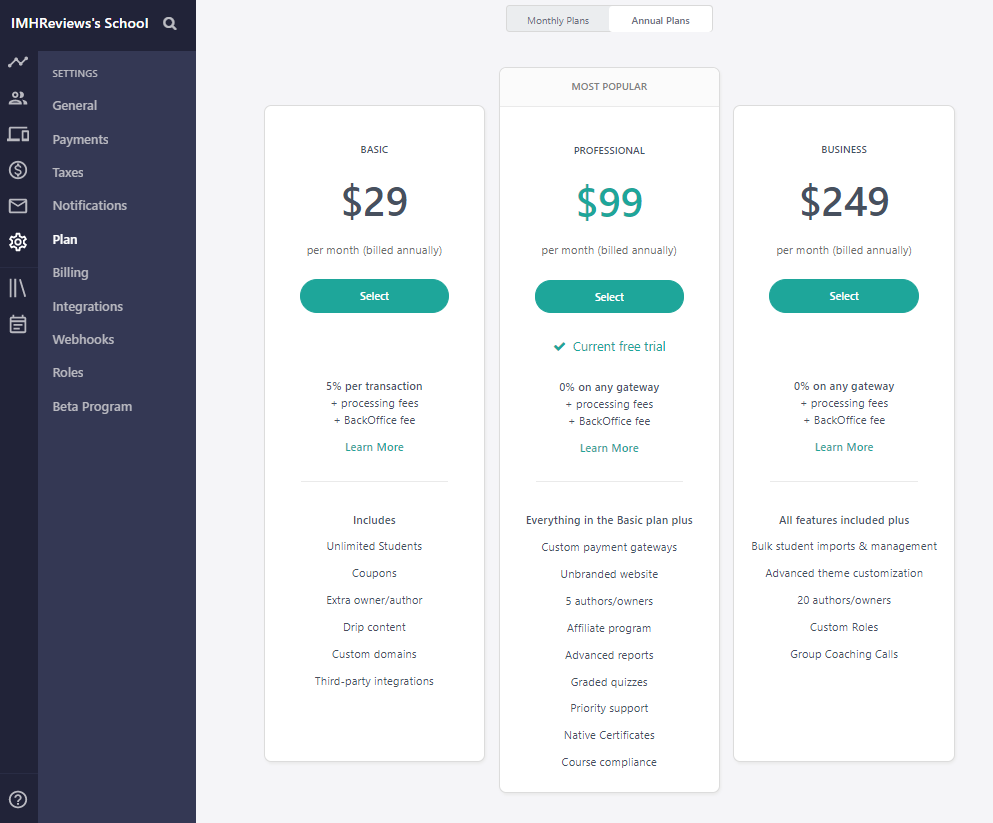
Plan
The Plan section is where you'll pick a payment plan for your Teachable account. You have the option of monthly or annual plans which are broken up into three tiers. You get Basic, Professional, and Business plans and can upgrade your plan at any time.
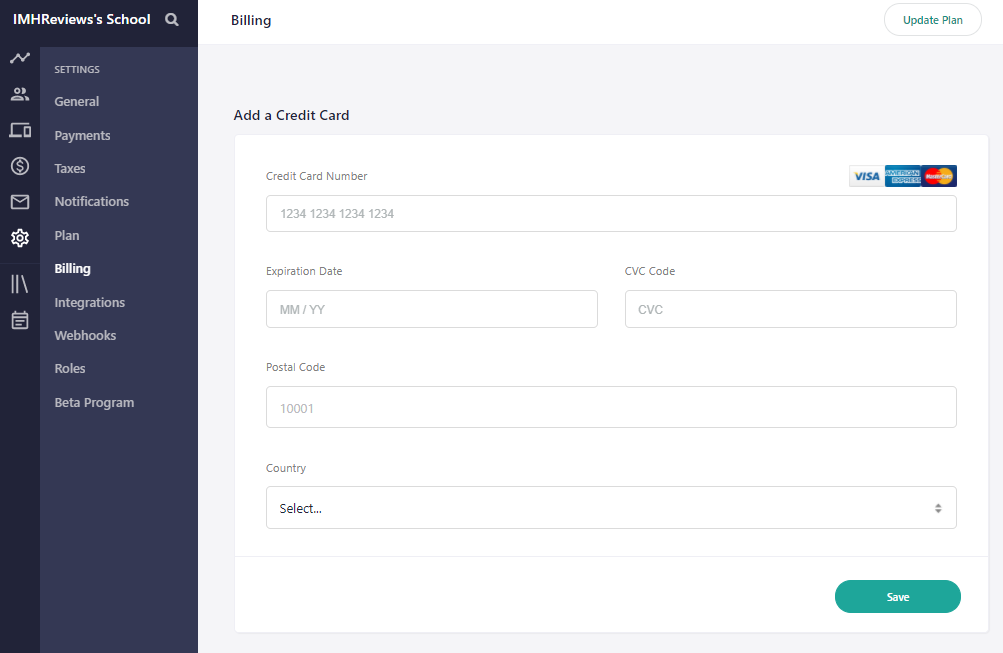
Billing
Billing is where you store credit card information to pay for your Teachable plan. It also shows a billing history of all payments you’ve made.
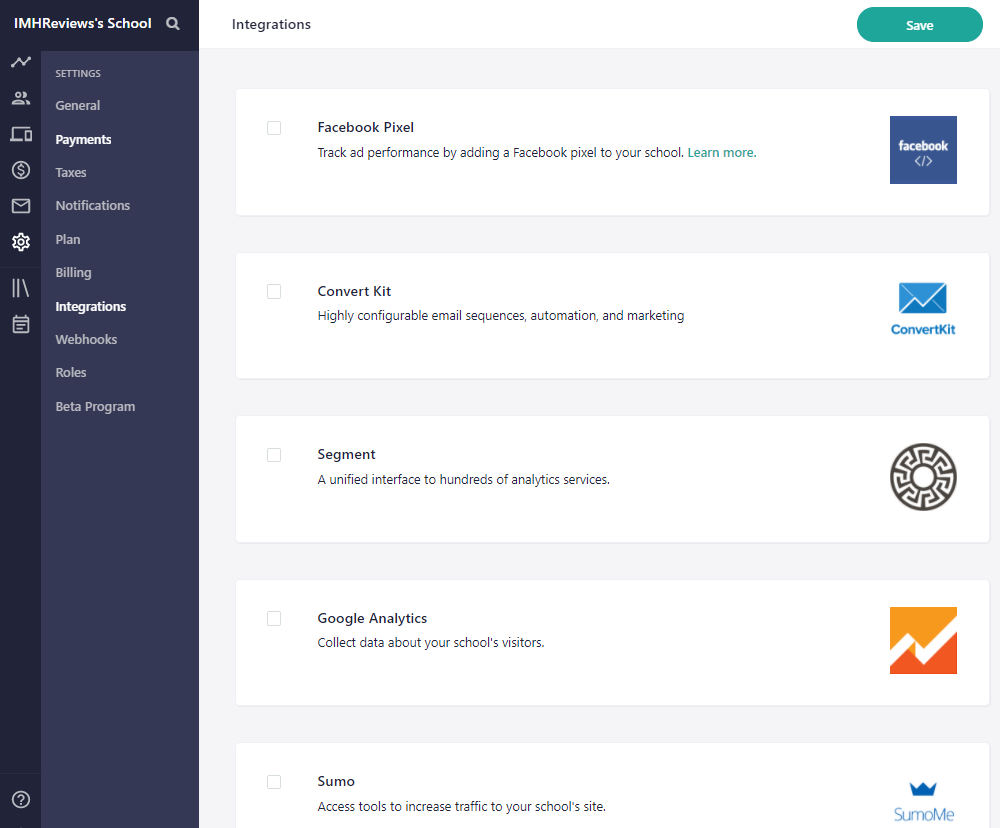
Integrations
Integrations are an integral part of running any online business. Teachable has made some smart choices to empower course creators. Amongst the integration available you can use Facebook Pixel, ConvertKit, analytics service Segment, Google Analytics, Sumo, and MailChimp. Through Zapier you gain access to over a hundred services like AWeber, Infusionsoft, Intercom, Active Campaign, Salesforce, HubSpot, and Slack.
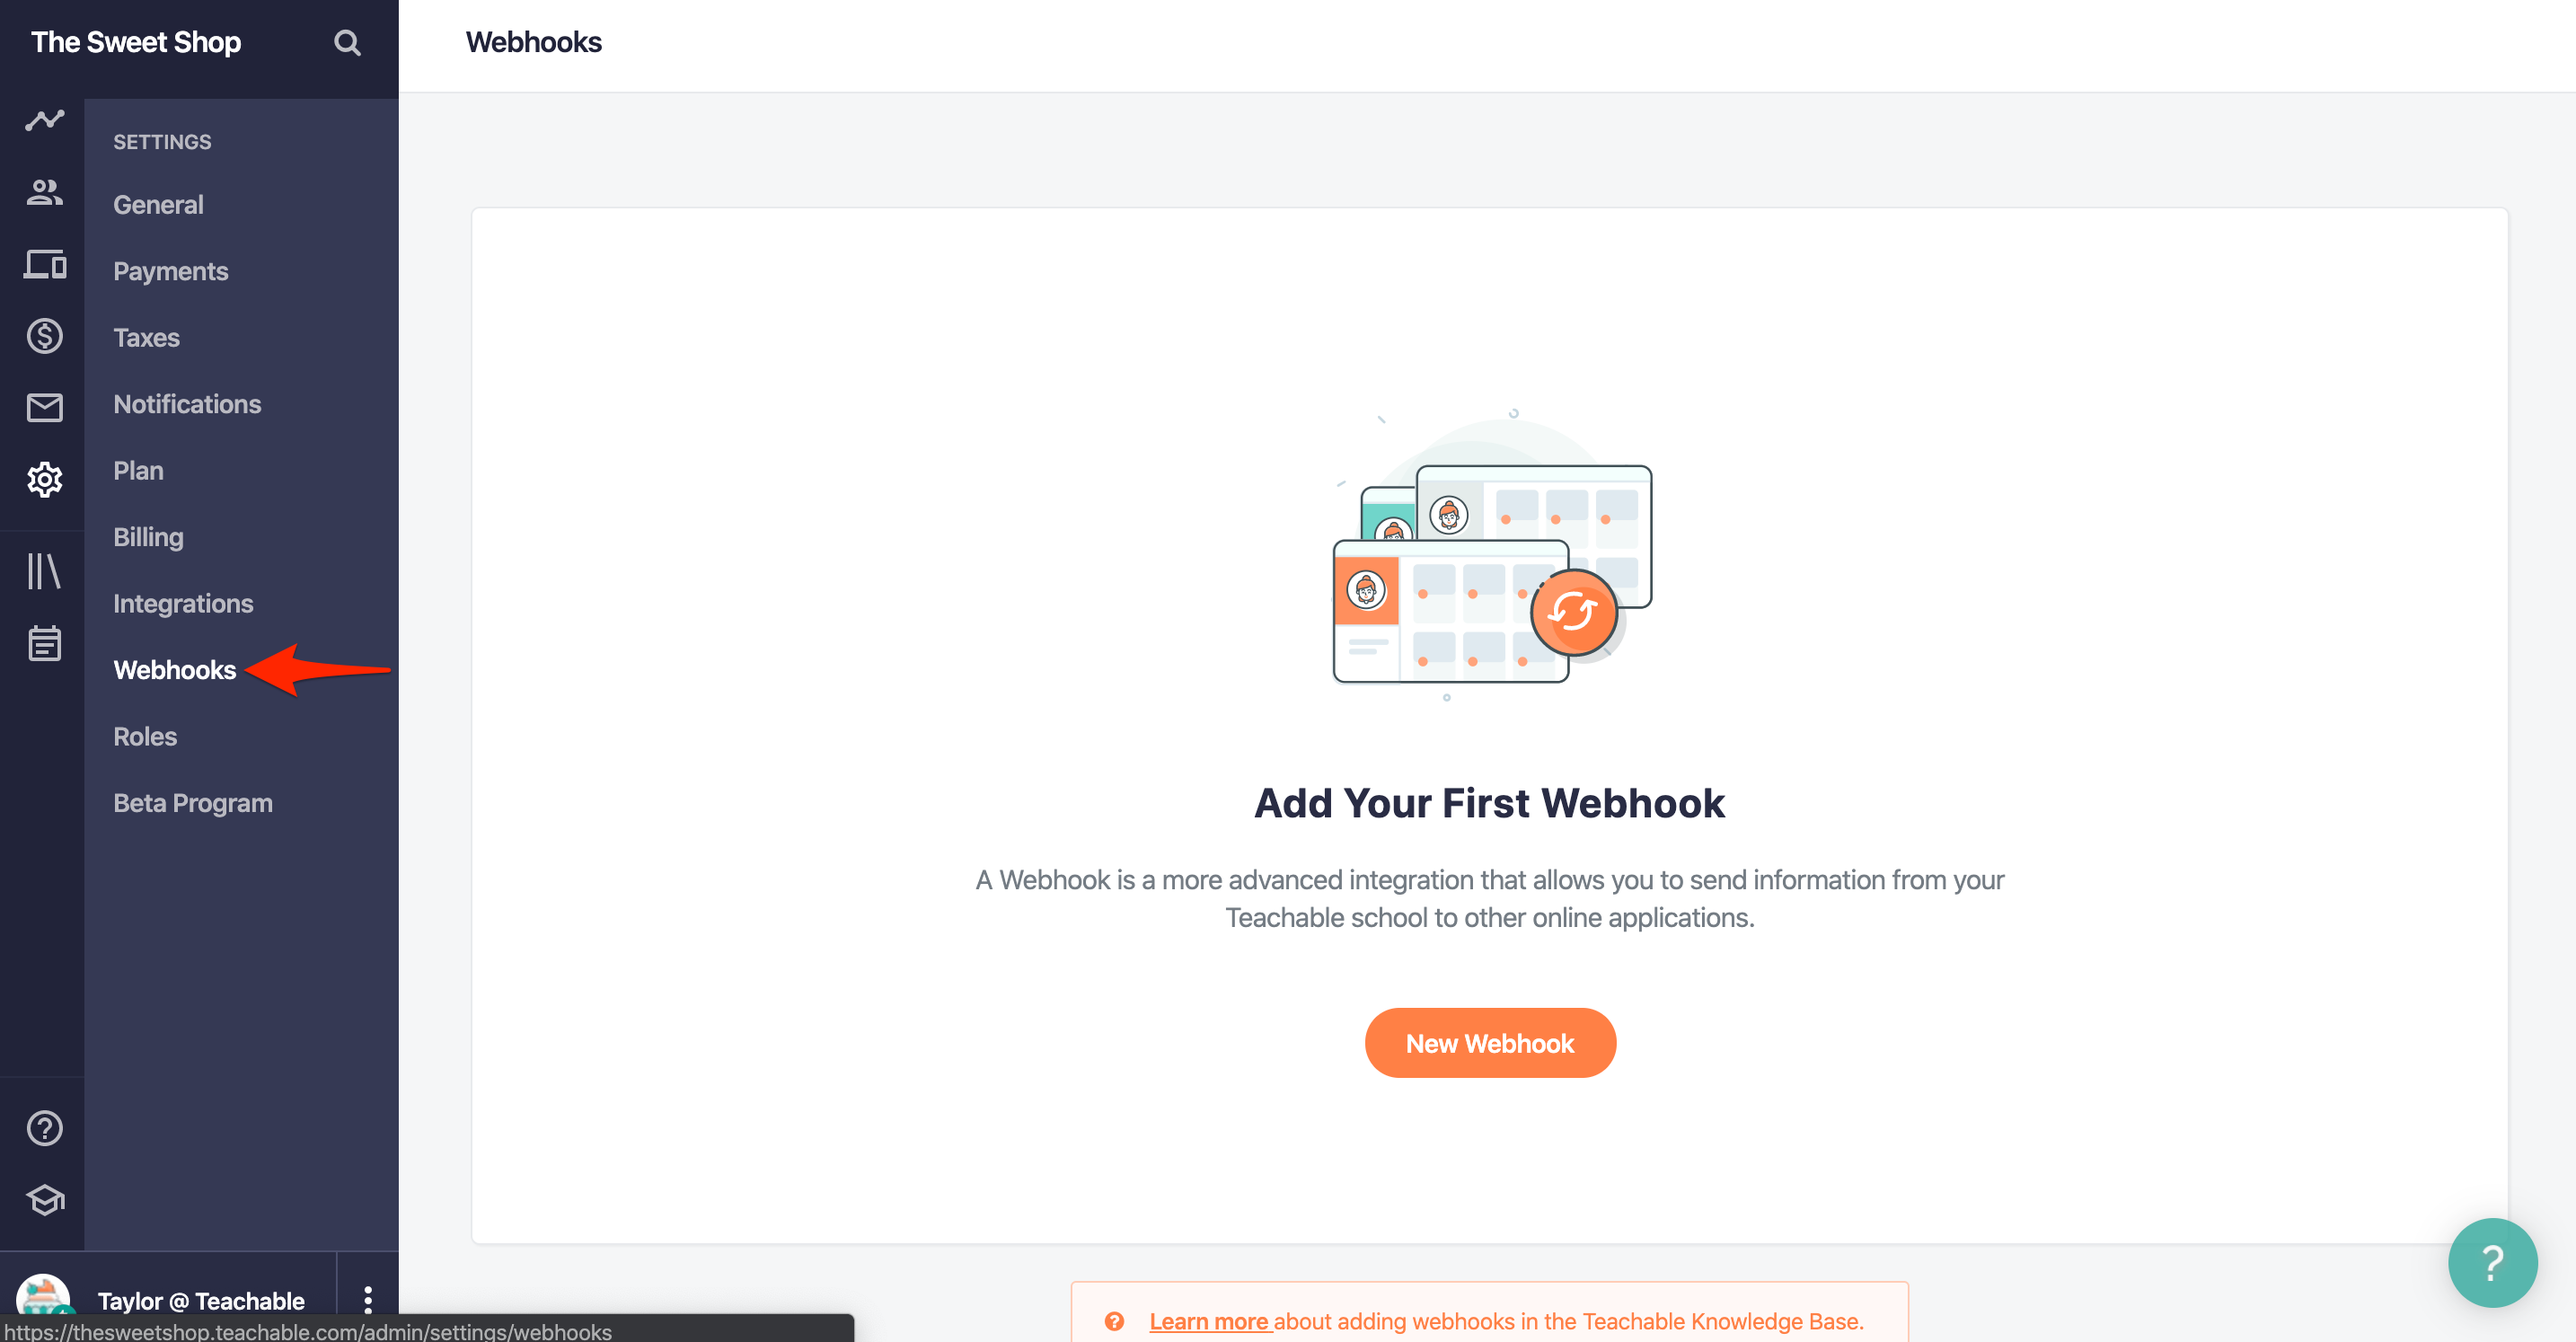
Webhooks
Teachable's webhook feature allows you to build smart triggers into your course. The process is simple, too. All you need do is enter a webhook URL, select an event trigger, and create your webhook.
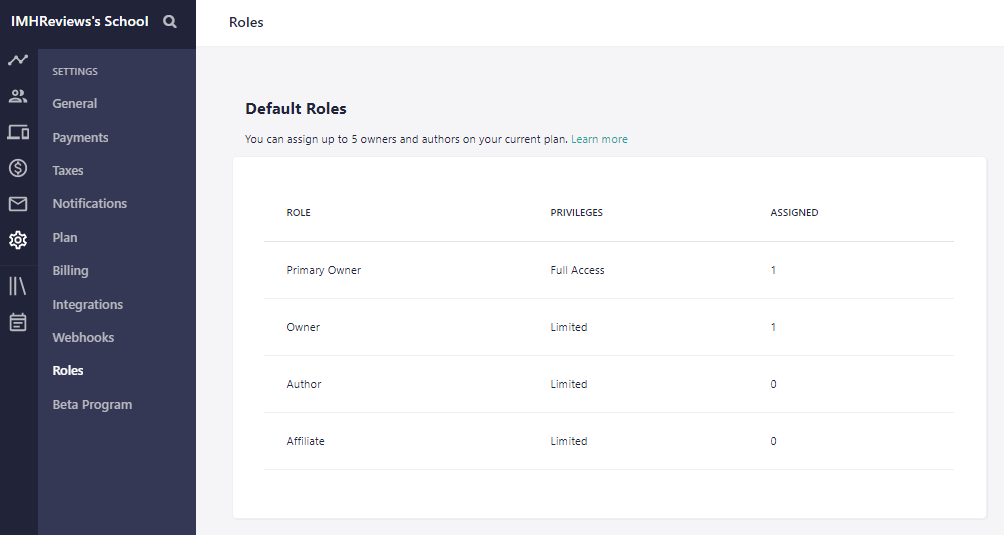
Roles
Roles controls the access and privileges for every person with a stake in your online course. They are five roles available which include the primary owner (automatically gets full access), owner, author, and affiliate. Customer roles can be created and maintained here as well, however, are only available on the Business plan.
Courses
Building your course is one of the more exciting aspects of working in Teachable. You get to exercise your creative genius.
Getting Started
To get started, click on the New Course button. Next, add a course title, subtitle, and choose a course template from one of three available. You can go with a Blank Template (build a course from scratch), a Mini-Course (create a short course to show expertise), the Standard Course (ideal for comprehensive course material). Once you select the type of course, click the Create Course button.
Creating your course opens up a world of features all covered below.
The Information Section
The Information section acts as a general area when you get to edit your course and sales page, update your course title or assign a category to your course. It also includes a branding section for you to add a custom thumbnail image for your course.
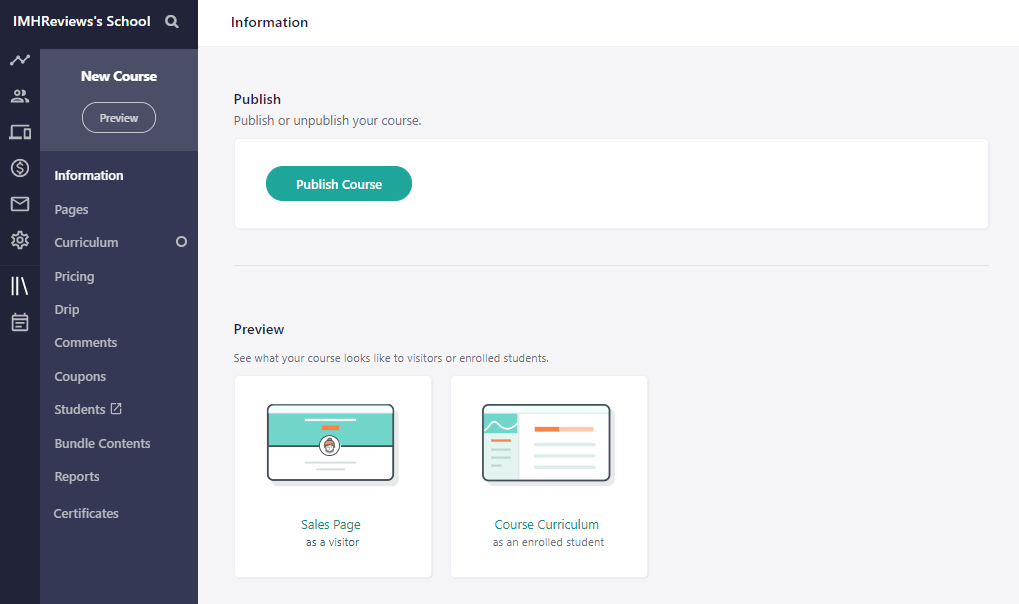
Ensuring that courses are complete can be a challenge. On Teachable, it's possible to enforce what is referred to as Course Compliance. It's a way to require students to complete certain actions in order to move to the rest of your course. And we like this idea. For more complex courses it makes for a better learning experience to require students to better understand fundamentals before progressing.
Regrettably, Course Compliance isn't supported by Teachable's iOS app. Compliance options include enforcing a lecture order, enforcing video watching to at least 90%, and enforcing a graded quiz that must be completed. You also get to set default pages like a thank you page, can permanently delete all course content, or duplicate the entire course.
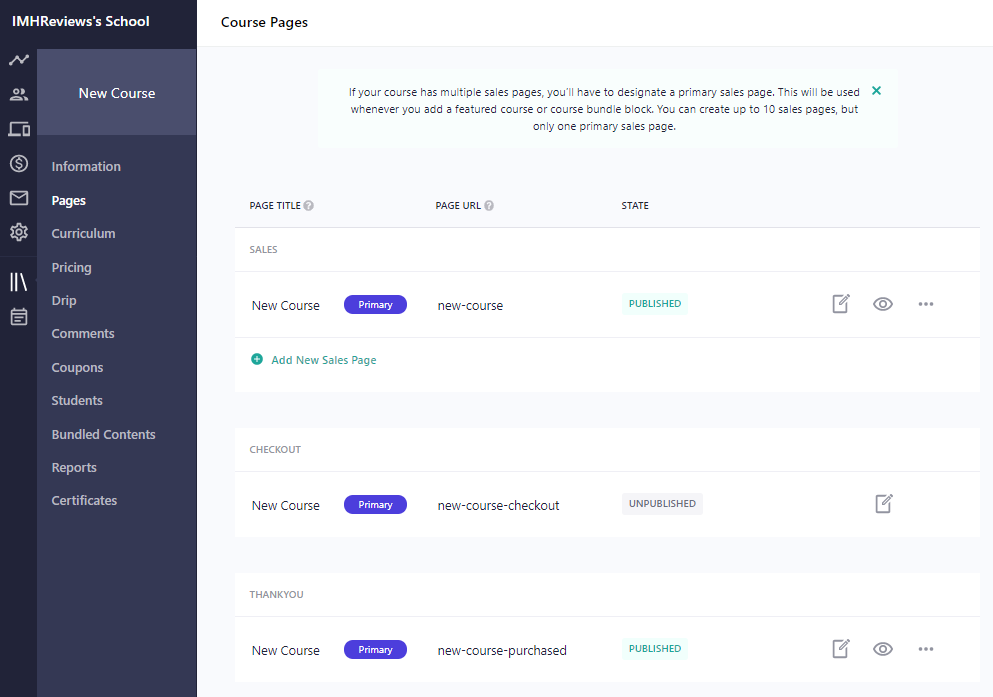
Pages
Pages is where you’ll find your sales, check out, and thank you pages. You'll be able to edit, preview, publish or unpublish pages, capture links, duplicate, rename page titles or rename page URLs.
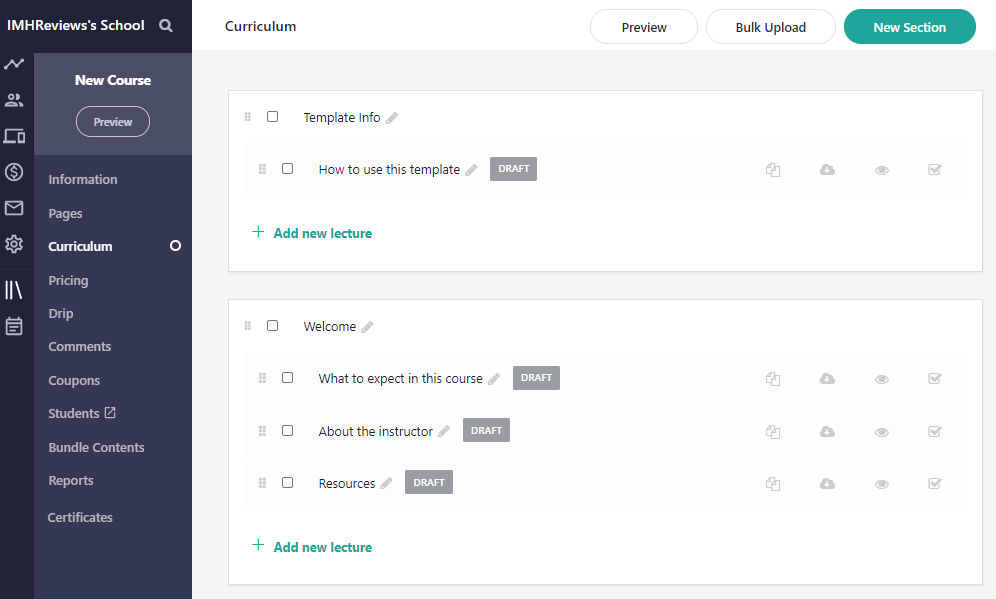
Building Your Curriculum
While creating your curriculum is typically one of the more complex aspects of building your course, it's relatively easy to put together in Teachable. Each course is broken up into sections where you can add lectures, resources, and quizzes. Lectures can also be duplicated, made downloadable, offered as a free previews, and published when you're ready.
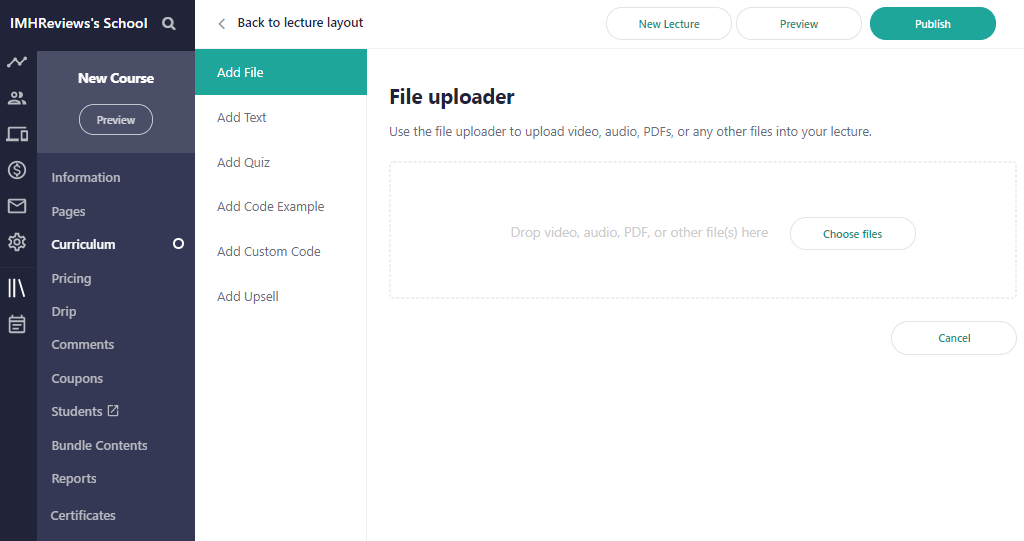
Because video is instrumental in the online learning space, you get the option of uploading a video file through the Add File tab. And this feature isn't limited to just video, you can upload audio, PDFs, or any other files into your lecture.
Adding text is straightforward. Using the rich text editor, simply copy and paste text or type it out.
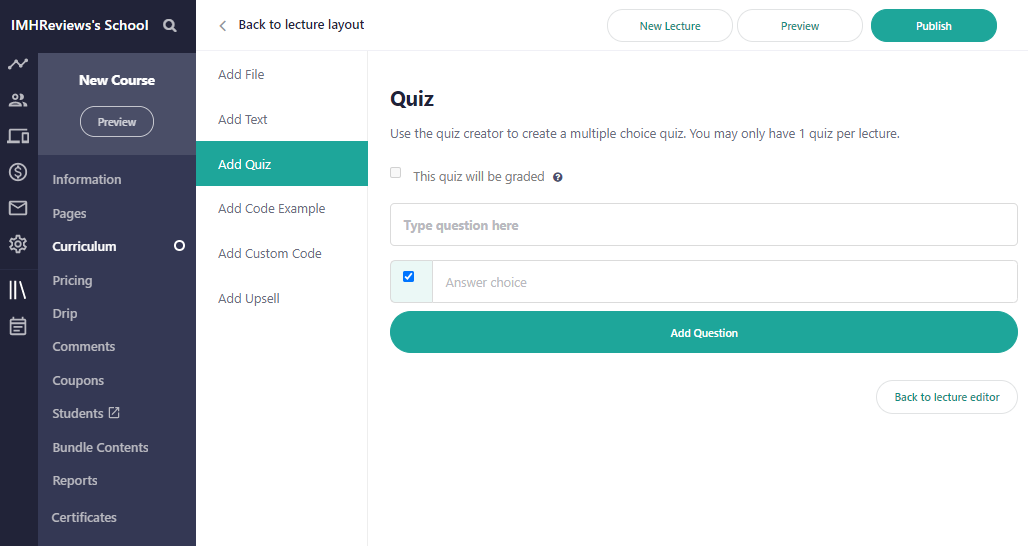
To quiz students, create yours by clicking on the Add Quiz tab. While quizzes are always a winner, we think Teachable falls shy of offering a robust quiz solution. Kajabi, for example, allows creators to offer multiple-choice, paragraph, file upload, multiple selections, and single selection options, while Udemy offers quizzes, coding exercises, and practice test questions in various formats.
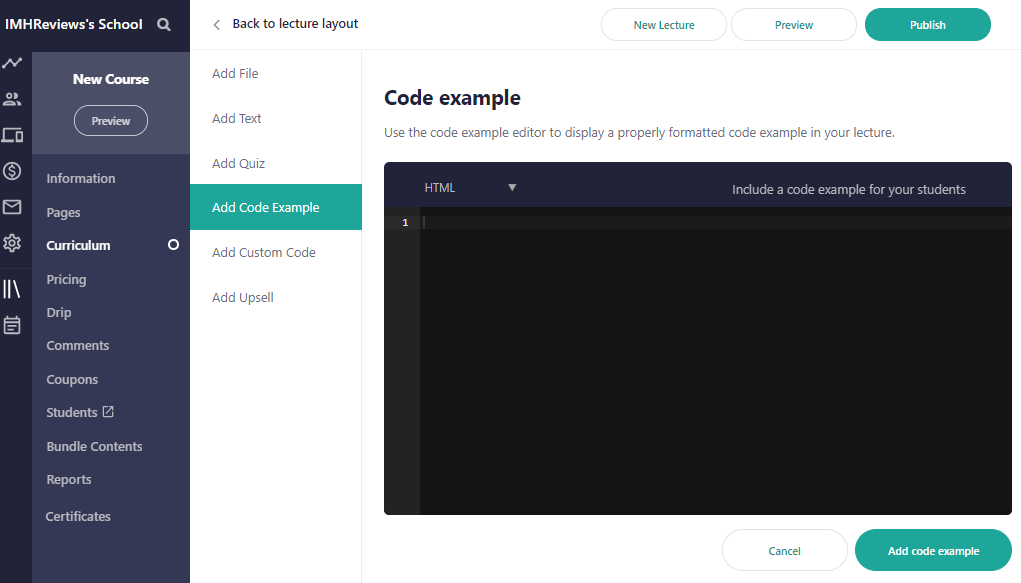
Teachable does, however, include an Add Code Example option for coding courses. And if you'd like to add custom code, you can do so by injecting custom HTML, CSS, and JavaScript into a lecture.
While we've covered upsells briefly, we were pleasantly surprised to find that Teachable makes them available from within lectures. You can add an upsell to any lecture and select one from your collection of complementary courses or coaching products already in your school.
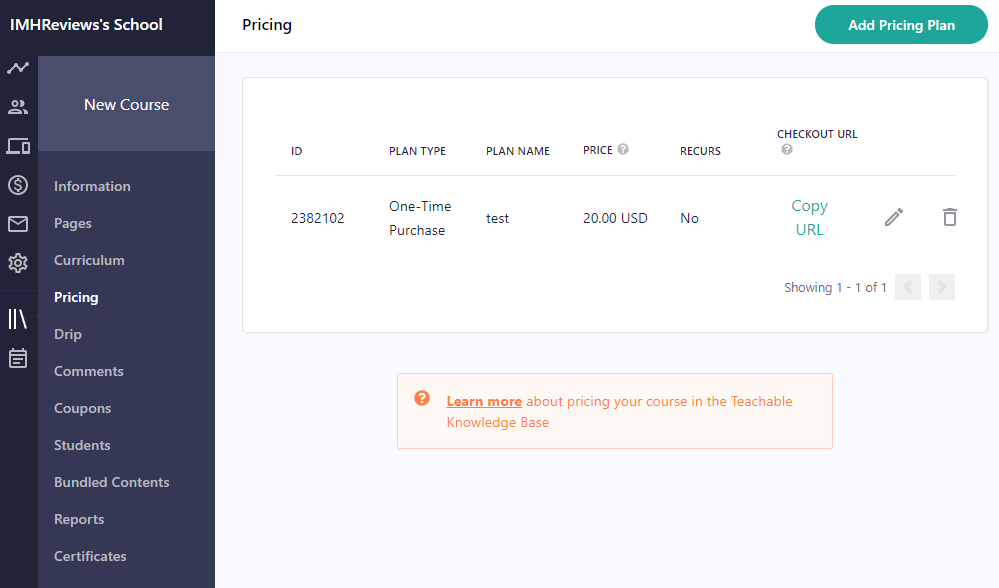
Setting Pricing
Teachable offers four pricing options. These are Free, One-time purchase, Payment Plan, and Subscription (monthly or annual). They are also easy to activate. Simply select your option, choose a currency to be paid in, set an amount, name your payment plan, and give it a subtitle and description. Plans can also be made available with limited course access. This means students get to access your material for a set time after which access expires.
Structuring Drip Content
Drip content is one of the more exciting aspects of creating an online course today. It enhances the learning experience, giving students enough time to adjust to new ideas before moving on to more complex topics. Teachable offers lecture sections that can be distributed in a drip fashion. Simply go to the Drip section and click on the Set Schedule button next to the section of your choice. Next, choose whether to release the content by a specific date or within a certain amount of days after enrollment.

Managing Comments and Students
Comments and access to student information have been covered but it's worth mentioning that both sections appear in the Course section. And this makes sense given that students ultimately take courses and comment on course material. Clicking on either link will take you directly to each section in your account.
Creating Coupons
Coupons are a great incentive for anyone looking to purchase a course. Teachable allows you to create coupons by adding a pricing plan (if you haven't already), assigning it to a course or courses in your school, creating a code, adding an internal name for your coupon, setting an expiry date, and including a volume of coupons that will be available.
And if you think that process is too slow, you have the option of using Teachable's Bulk Coupon Generator. It allows you to add a discount amount, set the number of coupons you'd like to create (along with the expiry date), and then download the CSV file.
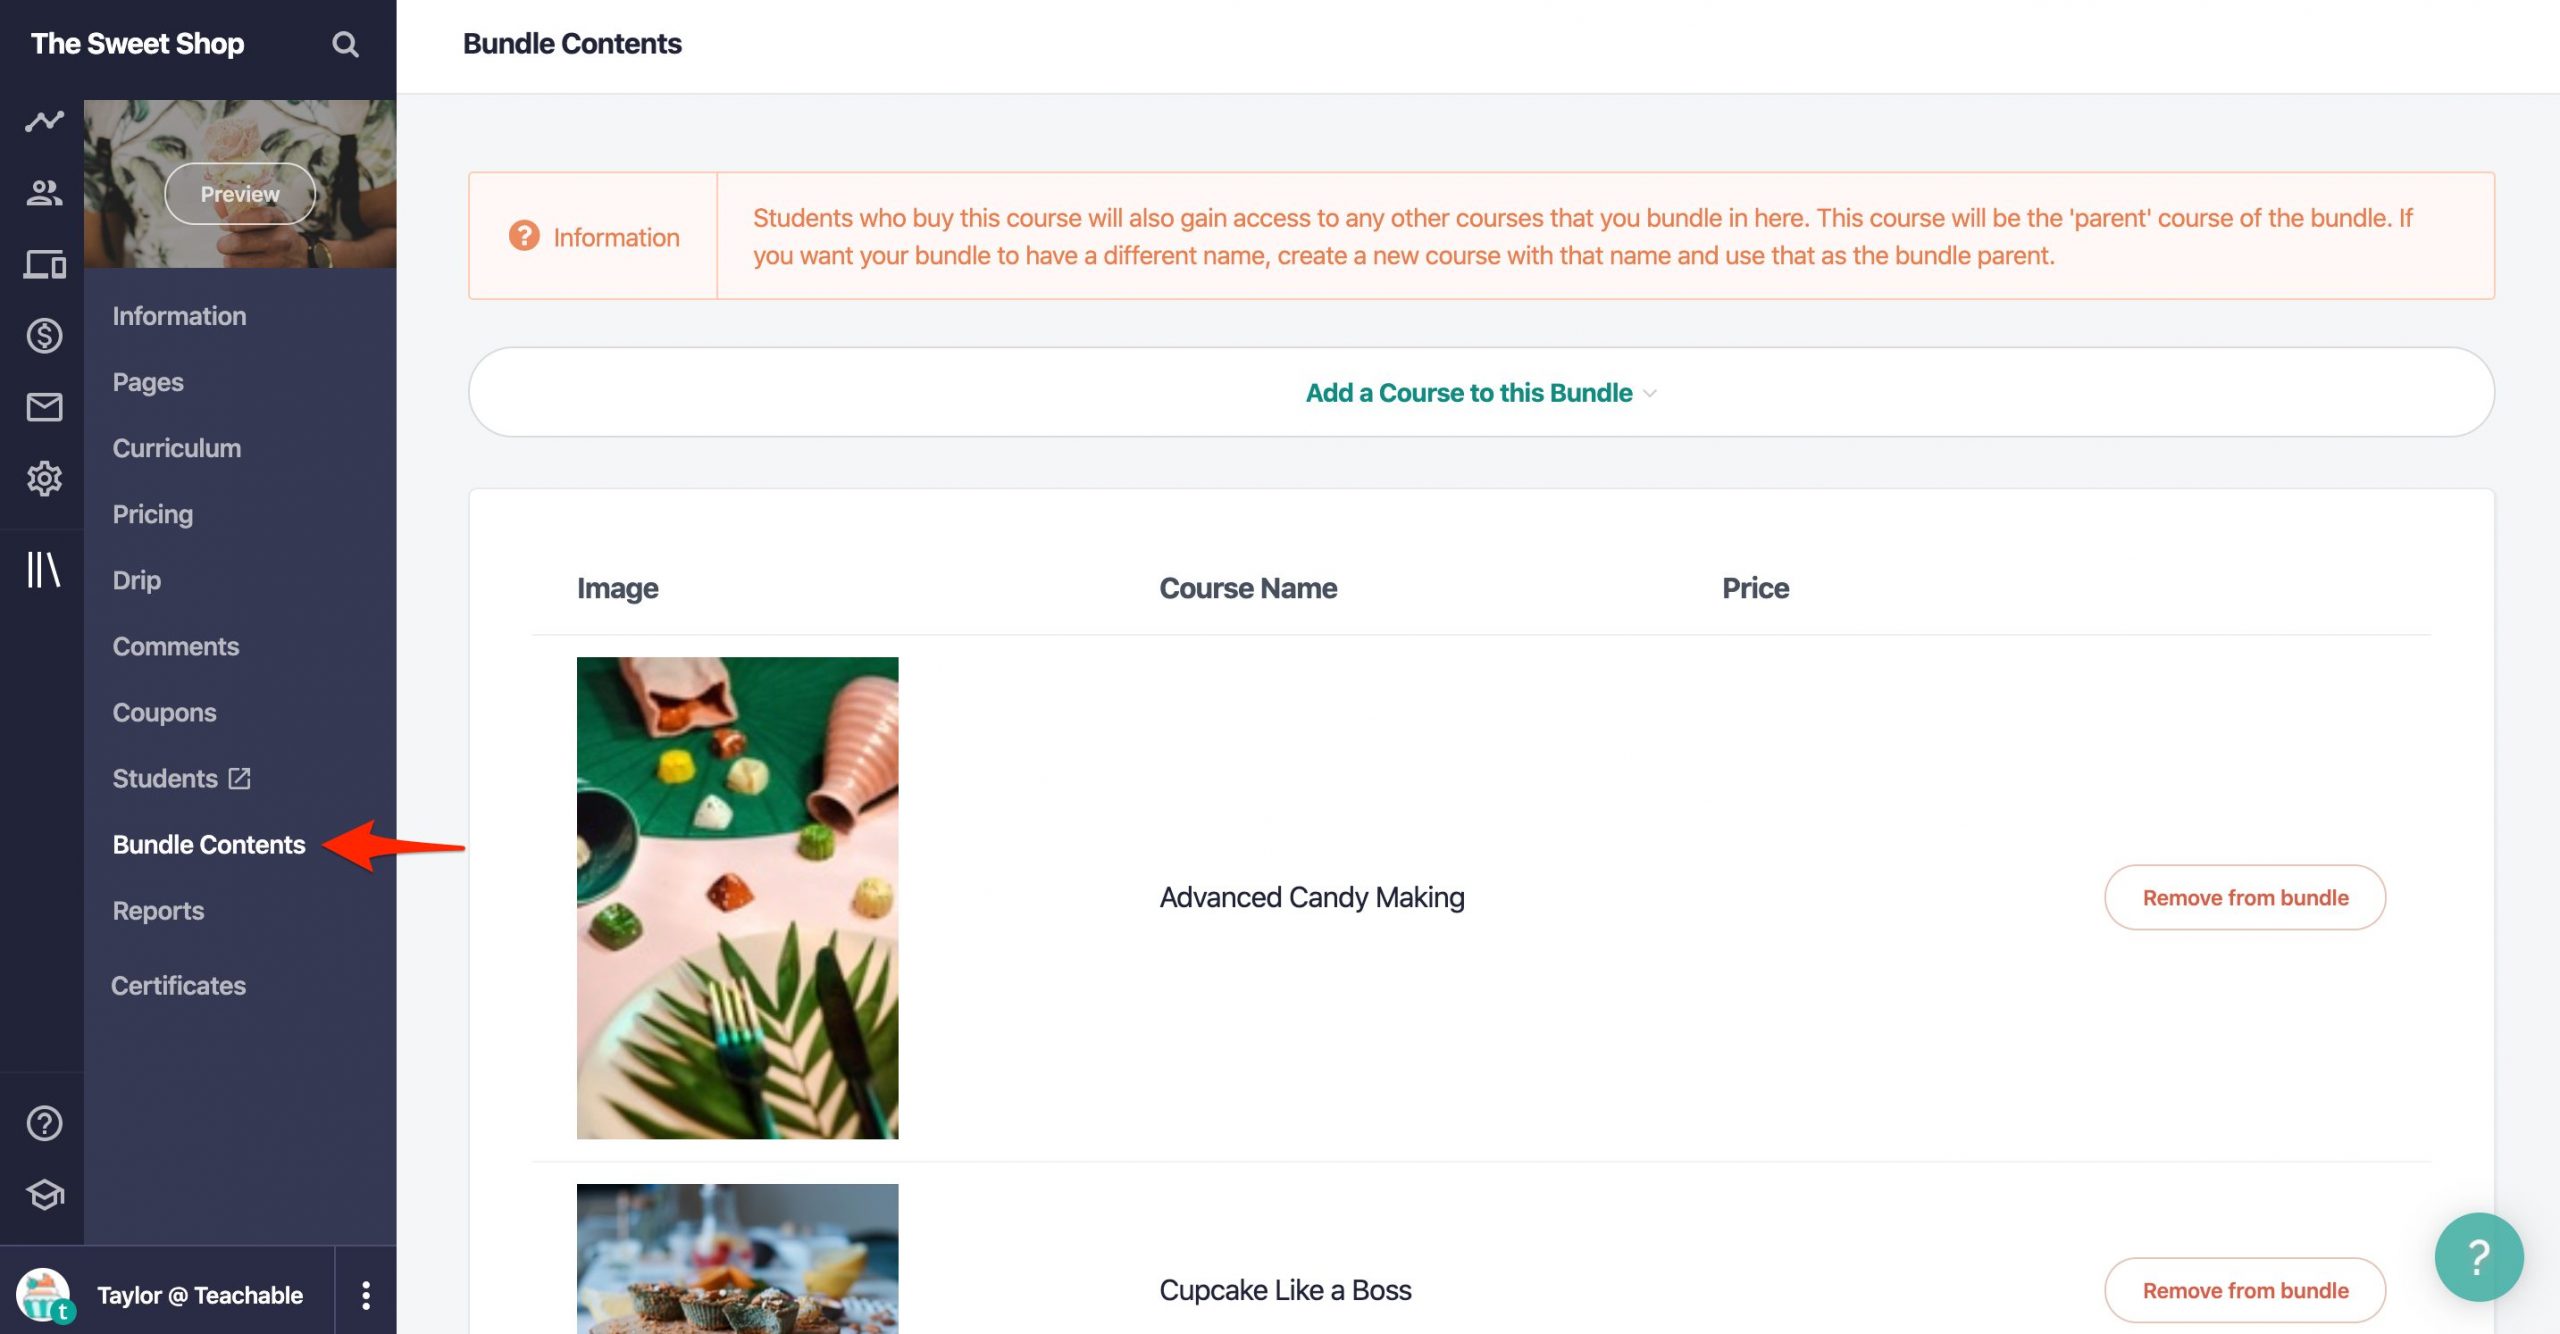
Bundle Content
Bundled content is a great way to make courses in your school attractive. Teachable makes it possible to combine courses to create a bundle with a few simple clicks. We think this is one of the smartest ways to sell more content and generate higher average sales values, and simply something that course creators you take advantage of.
Reporting
The reporting section for courses is designed to show you how well students are taking to your course. You get a snapshot of two tables. The first is a student breakdown which covers the percentage of lectures that have been completed, and completion rates of all students (including bundled courses), all students, free students, full-price students, and paid and discounted students.
Under the percentage breakdown heading, you'll see a table that shows the percentage of completion for lectures when courses are not bundled. Numbers include the percentage of completion in segments based on how many students have not completed the course, how many have completed between 1% and 25%, 26% and 50%, 51% at 75%, 76%, and 99%, and those who have completed the course.
Certificates of Completion
Certificates of completion, while not as powerful as industry-recognized certificates, still matter to students. Teachable offers these and they are really easy to create. You get an option of three templates and can create a custom certificate using Liquid/HTML.
Once you select a template, you’ll be transported to the certificate customization page. It's like the theme and page builder and allows you to add a logo, title your certificate, add a subtitle, the school your students graduate from, the date of the graduation, your signature, and a serial number. You’ll enter this information into fields in the left-hand margin of your screen and see a preview of the populated certificate on the right.

Coaching
The idea of offering coaching isn’t as common as it sounds. In fact, it's one of the upsell options we’ve seen any online platforms offer course creators. Teachable created this option and we think it's a great idea. Coaching is a huge industry and people are willing to pay personal engagement with coaches to help them generate better results. And for course creators who want to create an additional income stream, tacking on coaching as an extra product is a quick and easy solution.
Choosing Your Client Acquisition Strategy
Creating your coaching starts with naming your coaching service. Next, select your client acquisition strategy. You can choose from three options. These are:
- Directly: new clients visit your checkout page and sign up for coaching.
- With an intake form: interested clients complete an intake form and are sent to your checkout page.
- With an intake form and your approval: clients need to complete an intake form and will only be accepted into your coaching program with your approval before they proceed to the checkout page.
Pricing Your Coaching
Once you’ve determined your intake process, set your pricing by adding a fee, naming your pricing plan, adding a subtitle to your pricing plan, and a brief description.
Selecting a Start Date
Your start date can be an enrollment date that’s based on an ongoing coaching arrangement where clients must enroll for your coaching, after each coaching engagement is completed (think of these as coaching sessions). The alternative is a fixed date. This is ideal in cases where you offer recurring group classes which are based on firm or fixed start dates.
Creating Milestones
Milestones are one of the more simple, yet impressive additions we’ve seen added to a course platform. They set expectations for clients at each stage of the coaching engagement. Your first milestone is all about giving clients an idea of what they need to know once they’ve purchased your coaching.
Milestones can also include a calendar link where clients can set a meeting time. You can use Calandly or any other meeting tool to make your calendar available.
Review Before Going Live
Lastly, you get to review your coaching offering once saved.
Teachable Pricing
Teachable is known as one of the cheapest online course platforms available today. The Basic plan comes in at around $30/mo, the Profesional plan at $100/mo, and the Business plan at around $250/mo.
Teachable Support
Support is a big part of running a successful online business. Teachable’s team is available via email, and live chat for Profesional and Business plans, and only email for the Basic plan. In contrast, Kajabi is more hands-on and is available 24/7.
Help
Teachable provides a comprehensive knowledge base. It includes images and GIFs but regrettably few videos. Despite the lack of video content, help material is neatly categorized by task, making it easy to quickly find steps and get stuff done.
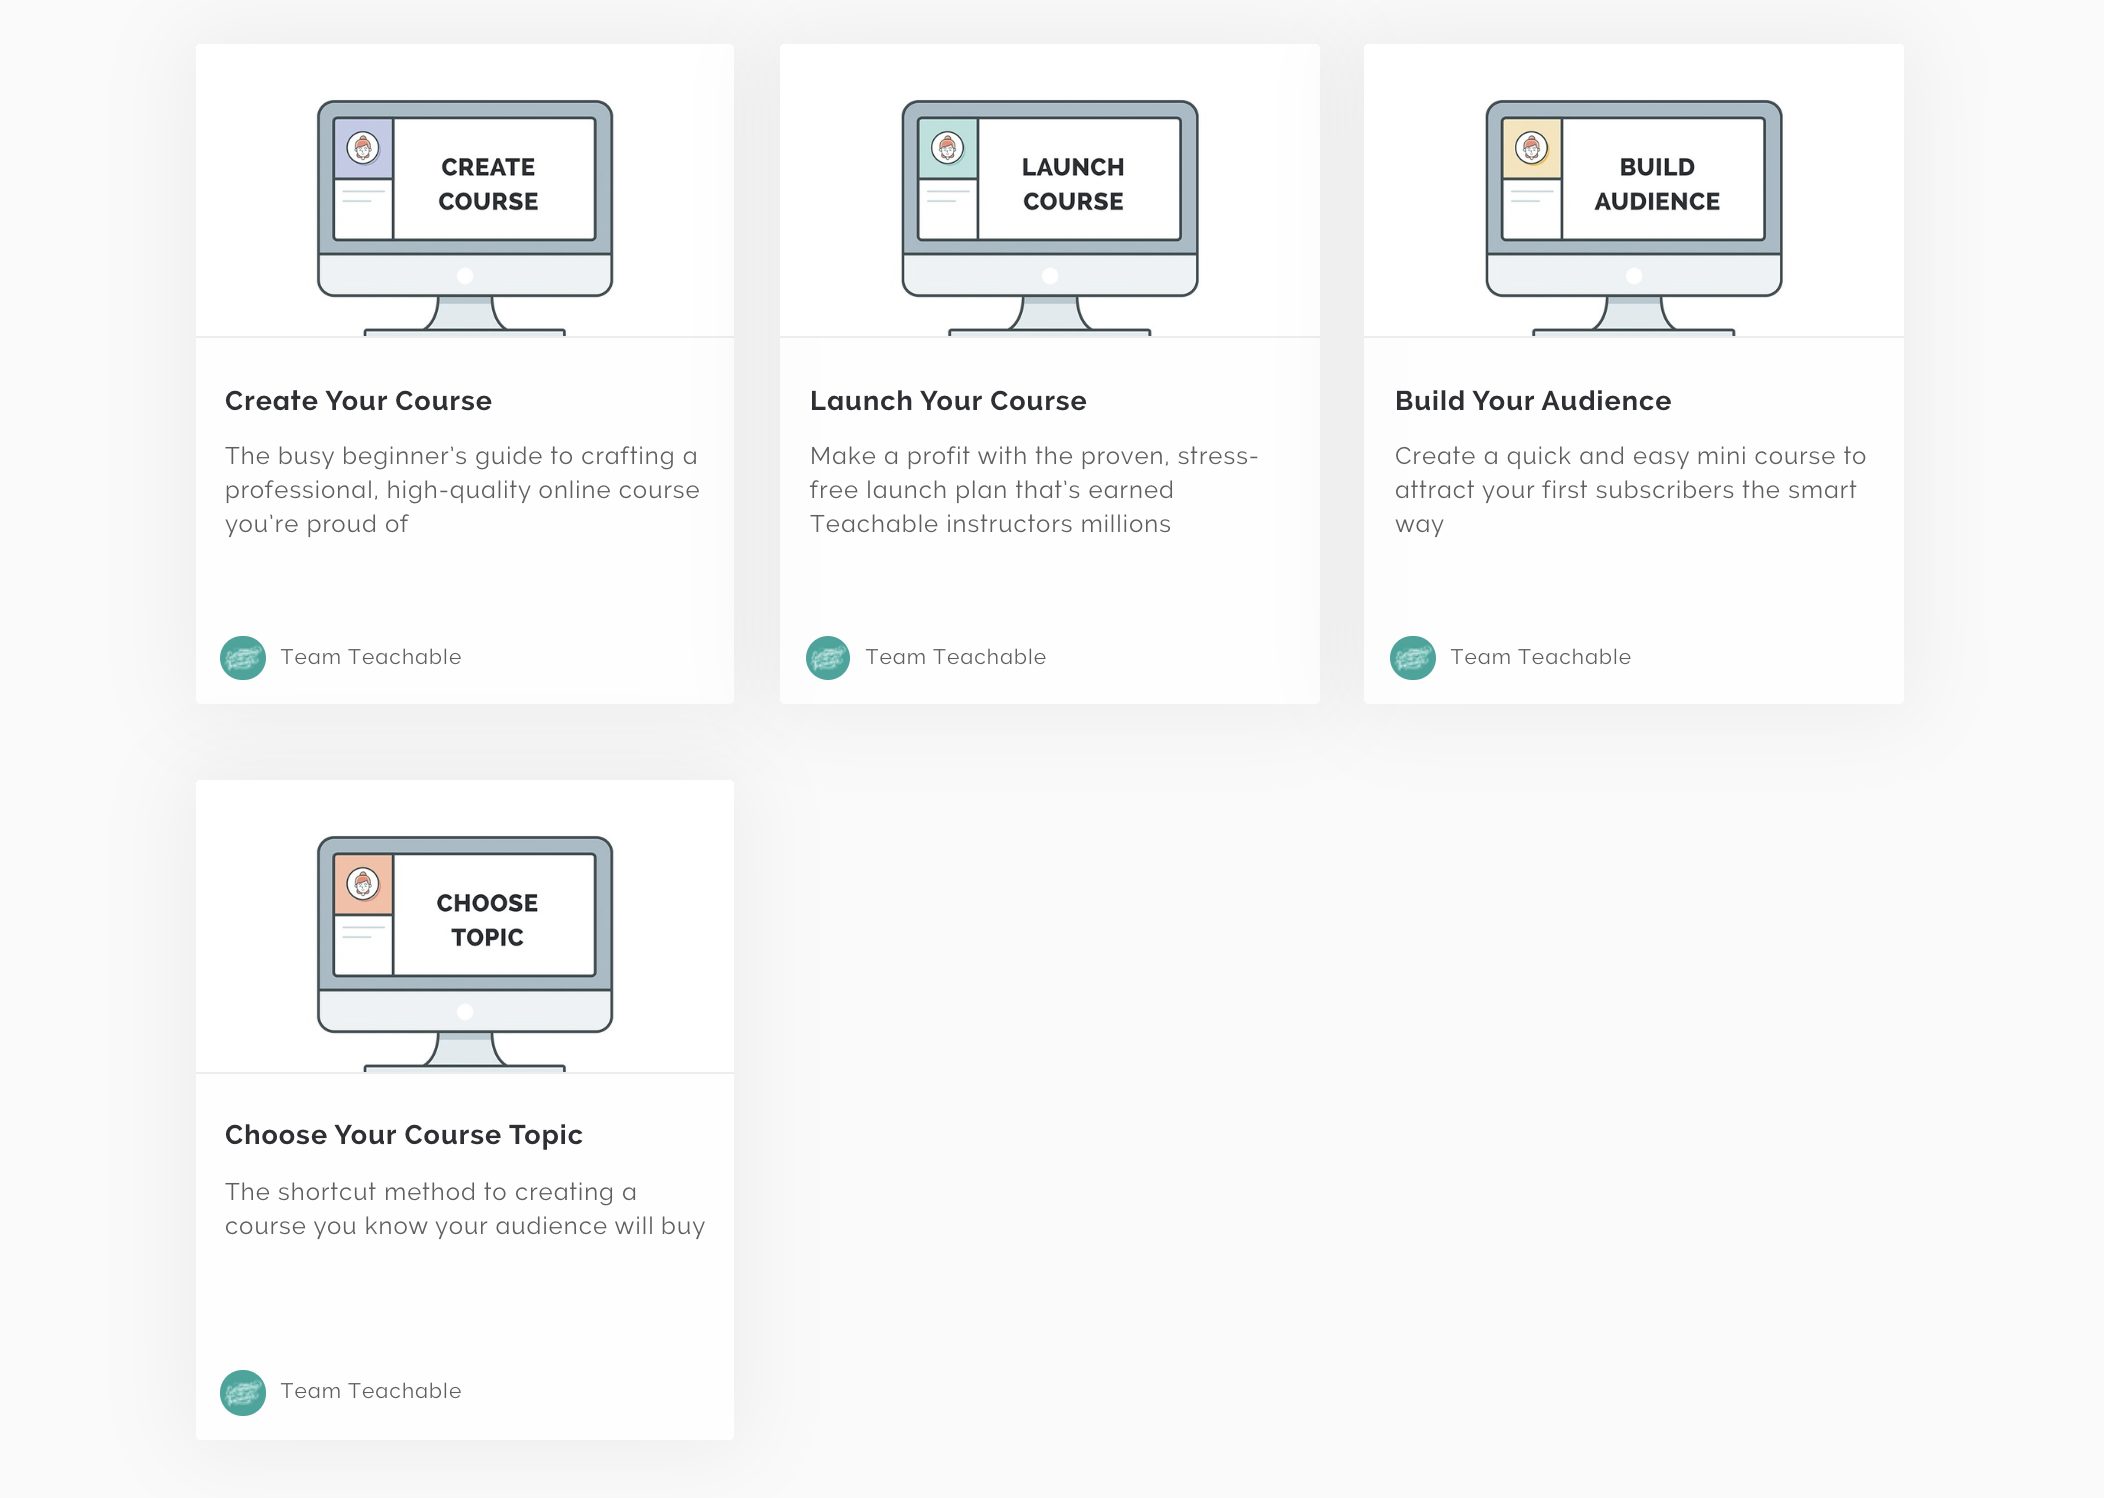
TeachableU
TeachableU is an online training school for course creators. It includes a step-by-step method for creating and selling online courses. To access TeachableU, you must upgrade to any paid Teachable plan.
Teachable Pros and Cons
Pros
- Clean design
- Offers advanced coding options
- Sales funnel capabilities
- Marketing tools
- Reporting or analytics
- 100+ third-party app integrations
- Support is available via email, and live chat
- Comprehensive knowledge base
- Student engagement tools available
- Drip content is available
- Can bundle and cross-sell courses
- Blog feature is available
- Affiliate program available
- Offers a 14-day no-credit card trial period
Cons
- No corporate sales option
- No course accreditation
- Limited site themes (just one)
Key Takeaways for Instructors
Teachable is an affordable and well-put-together platform. It includes the right balance of features to help course creators get up and running as soon as possible. While you only get one theme, the customization features make it possible to edit every element and make it your own. User features also make it easy to manage students and all other people associated with your course and school.
Teachable’s reporting functionality is robust. You’ll find it easy to track the success of your course by revenue and completion. Upsell features like coaching also make Teachable a valuable platform. As an instructor, you can easily offer coaching and increase your income.
Teachable Rating
Teachable is an easy-to-use platform. While it offers all you’ll need to launch your course, it does fall short when compared to other platforms. The availability of a single theme means less creative options for instructors. Payment delays for non-US, non-UK and non-Canadian instructors could deter international instructors from adopting the platform. While Teachable knowledge base is filled with help articles, visual learners who appreciate video may feel a little letdown.
Shortcomings aside, Teachable is one of the most affordable platforms to build your course on today. You are able to customize themes, pages and email content. You can also add custom code for unique design elements. Given these features, and many more covered above, it’s worth taking up the Teachable 14-day trial. Remember, you don’t need a credit card to explore the platform, making it easier to dig into.
Frequently Asked Questions
Teachable vs Thinkific: which is better?
While both are impressive online course platforms, they also offer similar features. Teachable is often positioned as a cheaper option, where Thinkific offers a free plan with limited features. Read our complete Thinkific review for more.
Teachable vs Kajabi: which is better?
Kabaji offers a wider variety of features than Teachable. From website themes to pipelines (sales funnels) and support, Kajabi is more comprehensive. But these extra features make it more expensive. Kajabi plans start from around $120/mo and range up to $320/mo. Read our complete Kajabi review for more.
Teachable vs Udemy: which is better?
Like Udemy, Teachable markets courses and offers a course creation platform. We’re Teachable excels is through its ability to allow the use of custom domains, coaching as a product, and upsells in lectures. Teachable courses are also not heavily discounted, allowing creators to make more money per course. And if you’re looking for the option of customizing the look and feel of your course, Udemy doesn’t offer customization. Teachable is more flexible, making it possible to change colors, fonts, and add custom code. Read our Udemy review for more.
Teachable vs LearnDash: which is better?
LearnDash is a WordPress learning management system. It connects to standalone WordPress websites and includes a range of features that Teachable offers, and more. For example, while you can create quizzes on both platforms, LearnDash is SCORM compliant.
Creators can also create assignments on LearnDash, where Teachable only offers quizzes that are limited to multiple-choice questions. LearnDash is also more flexible and allows the use of any WordPress theme, where Teachable only offers one theme. The benefit of using Teachable is the lower barrier to entry. You don’t need coding skills or have to worry about hosting your site. Teachable also offers many integrations with third-party apps.
Teachable vs Podia: which is better?
Teachable and Podia offer a collection of similar features. Both offer marketing and sales functionality in the form of funnels, integrations, affiliate recruitment, the option to bundle products, and more. Podia offers two plans, the Mover for around $40/mo and the Shaker for around $80/mo, where Teachable offers three plans that have prices ranging from around $30/mo to $250/mo. From a pricing perspective, Podia offers more value for money. Read our complete Podia review for more.
What Teachable alternatives or competitors are there?
There are many new and established course creation platforms available today. Some include Podia, LearnWorlds, Kajabi, Uedmy, Thinkific, and Skillshare.
Does Teachable offer free courses?
Yes. Teachable offers a range of free courses. View them here.
Is there a Teachable/Zapier integration?
Yes. Teachable offers Zapier integrations for over 100 third-party applications.
Does Teachable offer tutorials?
Yes. Teachable tutorials are available on their YouTube channel.
Does Teachable offer discount codes?
Yes. Teachable course creators can create and issue coupons.
Does Teachable offer affiliate links?
Yes. Affiliate links are available. When signed-up as an affiliate, you can earn 30% lifetime commissions on referrals.
Does Teachable award certificates?
Yes. Teachable offers certificates of completion.
Does Teachable offer a demo?
Yes. Teachable offers a 14-day demo for course creators.
Can Teachable create drip content?
Yes. Drip content can be scheduled by date or set for release within a certain number of days after a student enrolls for a course.
Is Teachable SCORM compliant?
No.
Teachable Review
-
Features
-
Support
-
Value for Money