As Thinkific reviews go, this will be your most in-depth and comprehensive look at the online course platform. As we’ve reviewed many other platforms, we’ve come to find that there are certain features that some platforms deliver well, however, others that fall shy of what course creators need to be successful. In this review, we’ll highlight the great features and share what we think can be improved upon.
Thinkific Review:
- What is Thinkific?
- Why Thinkific was Created
- Features Breakdown
- Manage Learning Content
- Designing Your Site
- Market and Sell Your Course
- Advanced Reporting
- Students Support
- Your Settings Area
- Getting Help from Thinkific
- Thinkific Pros and Cons
- Key Takeaways for Instructors
- Thinkific Rating
- Frequently Asked Questions
What is Thinkific?
Thinkific is an online course platform. It offers instructors a collection of features designed to create, market and sell their courses. These include a course creation tool, a website builder, a marketing and sales suite, and student engagement tools.
Why Thinkific was Created
It all started back in 2012. Something interesting happened. Greg Smith decided to take his LSAT course online with the help of his brother Matt. And it was a success. The revenue generated from his online course eclipsed that of his corporate law practice. And with the success of his online course, other entrepreneurs began to ask questions about how they could cash in on online courses.
So, Greg and Matt, along with Miranda Lievers and Matt Payne got started on what you now know as Thinkific. And in the last 7+ years, the team has achieved some amazing feats. Over 50,000 course creators have used the platform, 75 million courses have been taken, Thinkific is used in 190 countries, and they’ve helped course creators earn over $500 million.
Thinkific is home to some of the most prominent names online. Customers include former athlete and professional football player Lewis Howes, who teaches how to build a lifestyle business; Jonathan Levy, serial entrepreneur and founder of the SuperHuman Academy and TedX speaker who helps people improve their learning and memory skills; and Entrepreneurs on Fire award-winning podcast founder John Lee Dumas, who helps entrepreneurs launch and grow their businesses through coaching and online courses
Features Breakdown
Getting started on the platform is a simple two-step process. The first involves entering your name and email address, where the second is all about a series of onboarding questions all collected on one page. After that, you are immediately transported to your Thinkific dashboard.
Onboarding
Onboarding is an essential practice and one we've seen used across the board for all education platforms. It's the smartest way to help course creators get started. And for Thinkific, they've created a simple four-step process to help you become acclimated with the platform.
Her’s what that looks like:
Step one is the creation of your account.
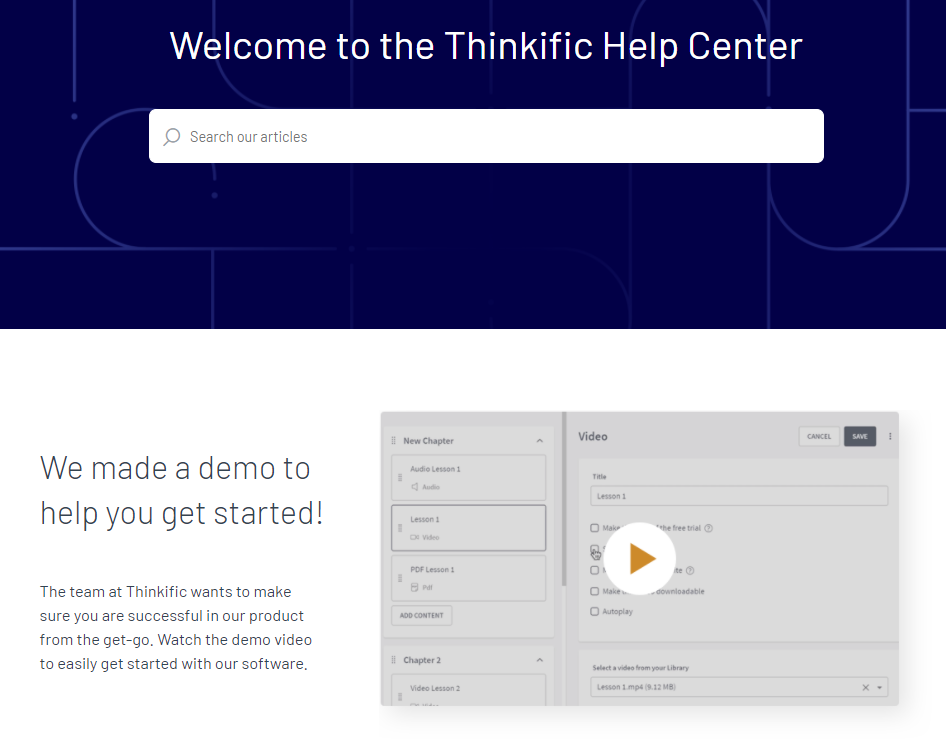
Step two is about exploring the platform, how things work, and all that you can accomplish using Thinkific. And we love the idea that demos are in the form of a video. It’s easier to get through and a great way to communicate what could be seen as a complex experience in a simple way.
As you move through step two, you begin building your school. Thinkific uses the term "school" as a place where all instructors can offer an unlimited number of courses. During the onboarding process you can customize the course player and later preview it.
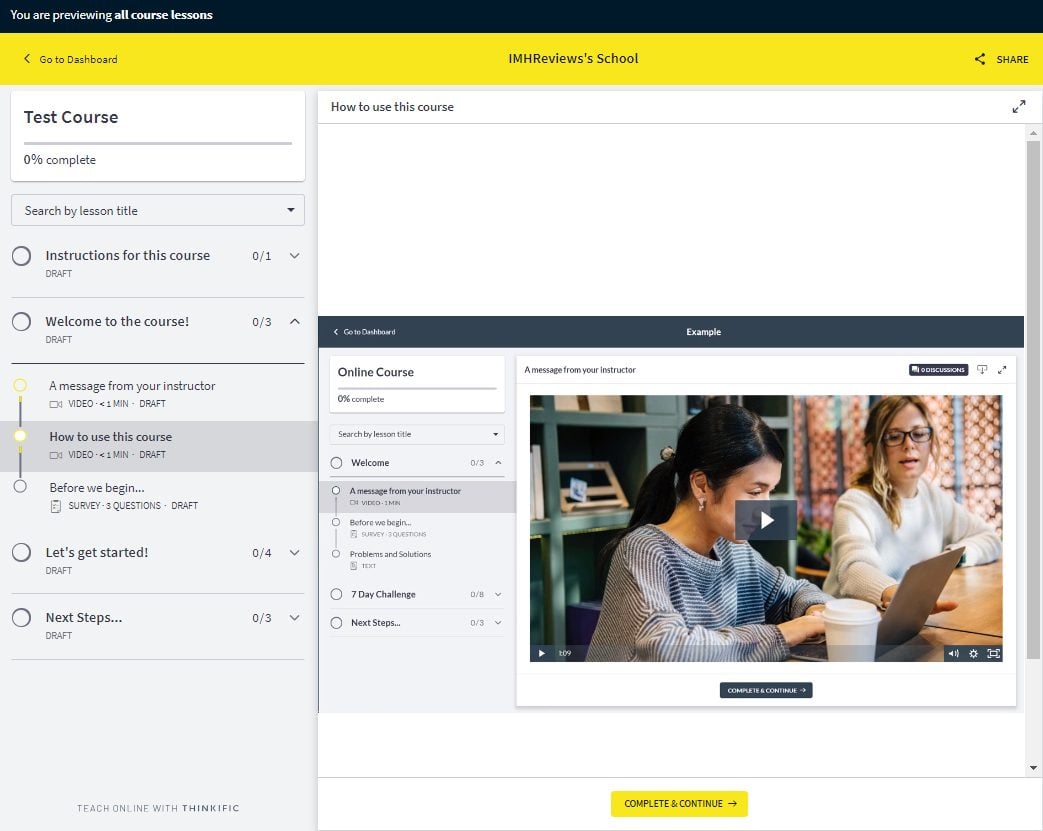
When you preview your customized school for the first time, you experience a pleasant surprise. A new window pops up with a video delivered by Paddy who walks you through the Thinkific student experience tour. Paddy explains that everything you see is customizable.
The preview window also includes short example videos. The second example video, or lesson two, is designed to show you what students see when they first access your course. It's a rundown of how to use the course of navigation menu. Students learn how to cycle through content, watch videos, ultimately check off what they have completed, and use the comment section (if enabled by an instructor). While all of this seems amazing, we love the idea that the student experience also includes a sample survey, presentation lesson, download lesson, text lesson, and a quiz.
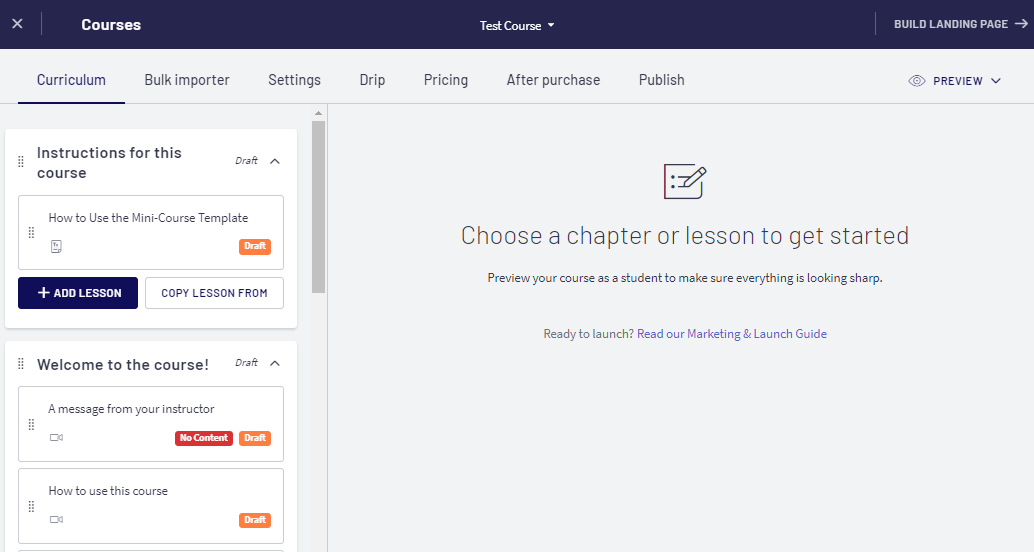
Course backend
Student course preview
As you can tell, a considerable amount of thought has gone into helping instructors quickly take to the platform. Completing the onboarding process leaves you feeling much more equipped than you'd imagine, lessening any anxiety you may have built up about creating your own online course, especially if you have zero experience.
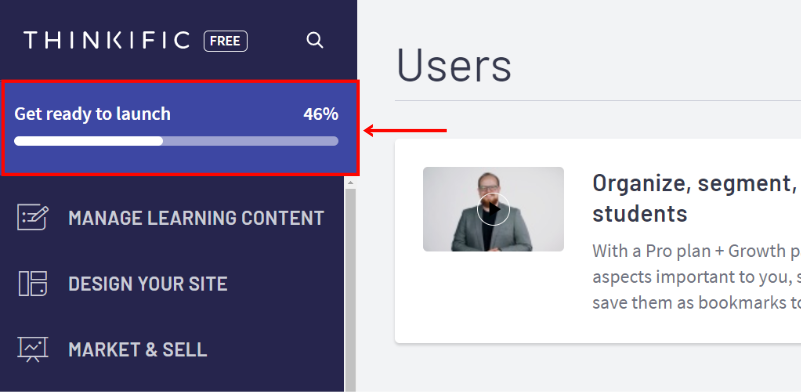
Thinkific's dashboard also comes with a handy progress bar. As you build out your course, the course progress bar is measured as a percentage towards getting ready to launch. As far as the building experience goes, this transforms the idea of creating a course from a seemingly challenging one to a fun, light, and exciting undertaking.
Manage Learning Content
Once you've completed the on-boarding process, you are pretty much good to start exploring the rest of the Thinkific dashboard. There are five core sections to work in, starting with the Manage Learning Content area. This part of your dashboard includes five sections.
Courses
Courses is where you'll find any existing course or begin to create a new one by clicking on the New Course button in the top right-hand corner of your browser window.
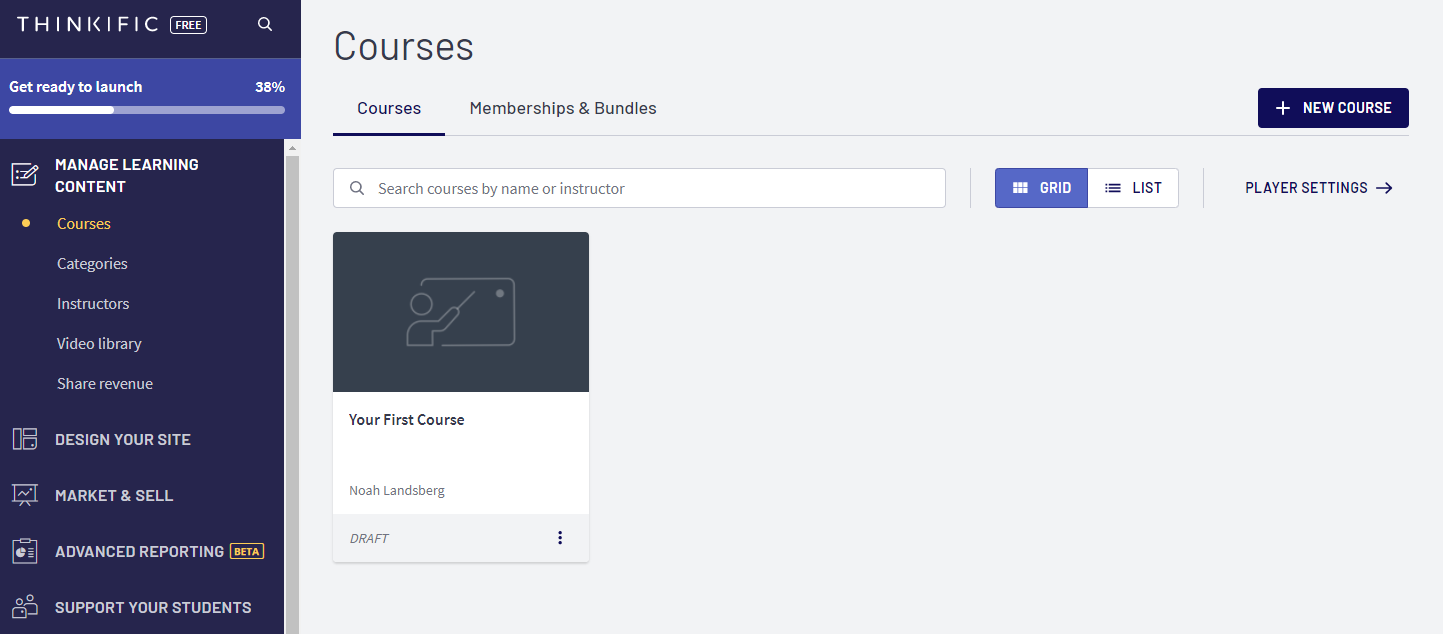
To get started on editing an existing course, simply click on the course and you'll be transported to a new tab. We love the idea that Thinkific continues the learning process for instructors by paying attention to how much experience instructors gain on the platform. As a newbie, Thinkific offers a quick tutorial on how to create your first lesson.

Creating a New Course
By default, loading your course page will show the course created during the on-boarding process, but this doesn't prevent you from creating a new course altogether and deleting the other. Clicking on the New Course button will launch a pop-up window to choose a course template.
Thinkific offers six course template options. They are:
- Blank: create a new course from scratch and tailored to your specific needs.
- Pre-sell: promote your course and generate interest by collecting email addresses for your course waitlist.
- Mini-course: create a free or low-cost mini-course to generate leads you can later upsell to a more comprehensive or flagship course or service.
- Flagship Course: create a complete online course with a comprehensive curriculum.
- Webinar Replay: host webinars that replay to allow registrants to view your presentation or offer on demand.
- Membership Resource Library: host a collection of downloadable content as part of a membership bundle.
Once you select a course template, enter your course name and click on the Create Course button. Thinkific will then send you through to the course section where you'll see a breakdown of your curriculum and the course template structure to edit and add content.
Thinkific has the ability to preview your course. Typically, most platforms offer a preview of a specific page or a limited preview of what students will see. Thinkific offers two options. You get to see all course lessons and the course as an enrolled student.
Building your first course offers a collection of features all presented as a menu at the top of your browser window. In addition to the curriculum, where you'll add chapters and lessons, you have six other tabs to explore.
These include:
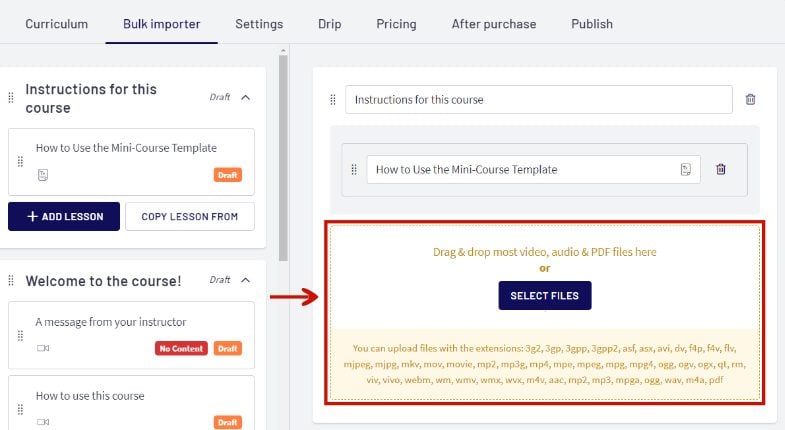
Bulk Importer
Bulk Importer allows you to drag-and-drop video, audio, and PDF files. In fact, you can drag-and-drop 44 different file extensions, making it easy for anyone on a platform to quickly build course content. The bulk importer also allows you to add chapters and leverage the drag-and-drop feature to add content to each. This is a godsend for a comprehensive course. You don't need to upload individual file types as you build your course, but can send them into the cloud in one go and select them as you create lessons.
Settings
Settings lets you update backend aspects of your course. This area comes with seven sections, and these include:
Basic settings: update your course name, course URL, select an instructor, and upgrade your Thinkific plan if you haven’t yet.
Course image and description: add a course image description
Course Player Appearance: changing the design elements including the theme, primary color, font, and your course player logo.
Course Progress and Completion: customize how students progress through and complete your course by activating and deactivating video lesson autoplay, requiring video completion, enabling chapter completion messages, providing a completion certificate, and customizing your course completion page.
Page Code: If you need additional design elements added to your course, JavaScript can be added to the footer of your course. You can add variables like a student name, course price, product ID, and a course ID.
Admins and Revenue Partners: used if you'd like to give access to a limited version of your admin dashboard.
While there is a general settings section in the main left-hand navigation menu which includes some similar features, we like the idea that you get to make updates for each course via a unique settings tab. It makes for a cleaner course management experience.
Categories
Categories are a smart addition to Thinkific's dashboard. They become available when you have published at least two courses and allow students to sift through courses for classes on similar topics. You can add and remove categories, add a category image, add courses and remove, and edit categories.

Instructors
The instructors area shows a list of all instructors added to your school. You can add a new instructor by clicking on the New Instructor button. Doing so will send you to a page to add your instructor’s first name and last name, email address, title, a bio, and an instructor profile image.
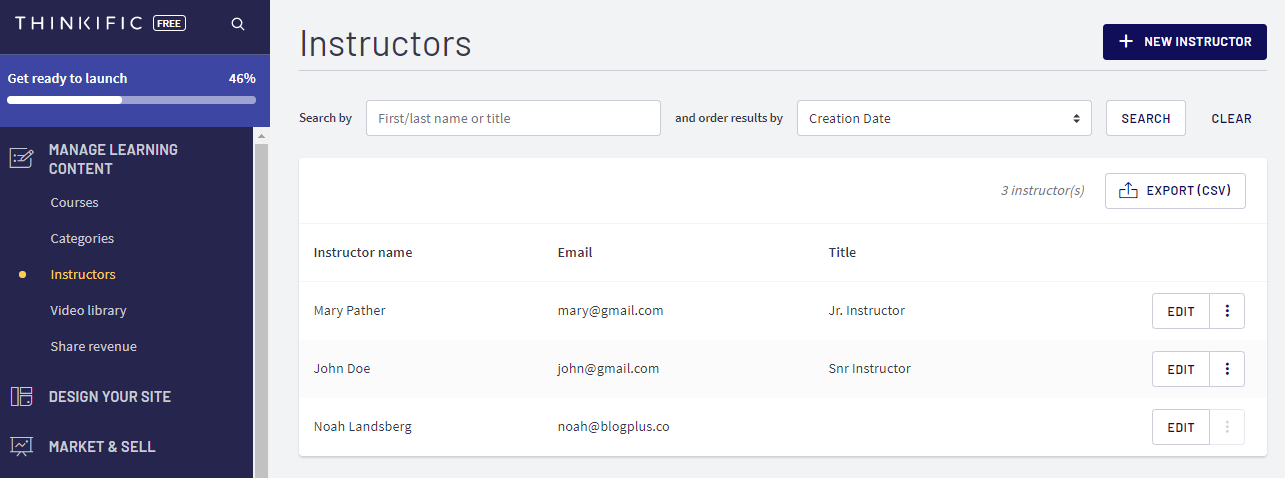
The instructors page also allows you to search for instructors by first or last name or title. You also have a filter feature that allows you to arrange results by first or last name. If for some reason you need to export a list of your instructors, you have the option of doing so in CSV file format. And if you need to edit instructor details, the Edit button next to an instructor’s profile makes it possible.
Video Library
Building a course is a mammoth task. It requires a lot of planning and attention to detail. If you're considering creating your course or have already published one, you know that arranging content is likely one of the biggest challenges you’ll encounter. While we've touched on the bulk content upload feature, you really get to see it shine in the Video Library section of your dashboard. Thinkific allows you to upload your videos in bulk, add captions, and offers you analytics on their performance.
But exactly how feature-rich is this section? When we took a closer look, we found that you could preview your videos, edit video titles, add and update thumbnails, and close captions, change the color of your video controls, remove the students' ability to fast-forward videos, download, archive, and delete videos.
When it comes to video analytics, all you need to do in the Video Library is click on the Edit button for the video you are interested in, then scroll to the bottom of your page.
You'll find:
- A percentage of average engagement which indicates how much of a video is watched on average.
- The number of total plays a video received.
- A percentage that indicates a play rate. This represents how many people click on the play button after the page loads.
- The date when a video was last watched.
Altogether, we think these stats are gold. Few online course platforms provide this much insight on how well content performs. When you know these numbers, you can use them to structure your material and elevate the quality of your course.
Share Revenue
The Share Revenue section of your dashboard is dedicated to showing the revenue generated from a course produced with the help of other creators. This can be when you've actively partnered with someone to create content for a brand new course or where you're bundling an already-created course as part of a larger offer for your students.
This is one of the surprising features we’ve come across in Thinkific. It makes the daunting process of managing funds and making payments much more simpler. Rolling this feature in shows that they really have a good handle on who their instructors are and how they generate income.
In this section, you can create a revenue partner, determine what they receive revenue for, and assign a percentage they are paid.
Designing Your Site
Site design isn't for everyone. The idea of working with code or trying to understand it, or finding the right images and copy, make for a painful experience if it's not your forte. Thinkific handles the creation of your site in a simple fashion. Here's a look at what you get when you begin building your site.
Site Builder
Clicking on the Site Builder section will send you through to the Site Builder page. You'll be met with a welcome message and the option to start a tour that will take you through how to create and customize your course website.
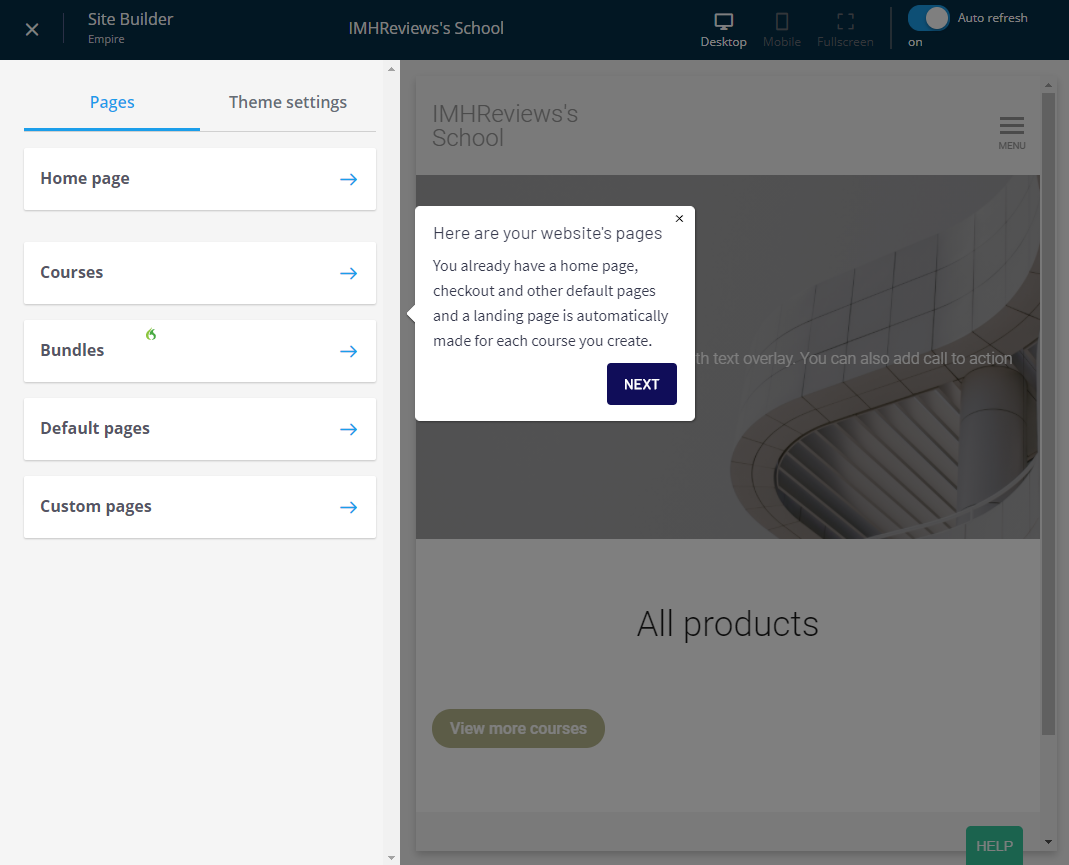
Using the Site Builder, you'll be presented with a left-hand panel where you can make all your edits to content. To the right, you'll see a preview of your site where updates appear as you populate your left-hand panel.
This approach to site design has pretty much become the standard for online learning platforms. It simplifies the complexities of web design, making the process easy to complete. In the left-hand editing panel you can add and edit everything from header, banner and product sections to headings, buttons, body text, and images on your site.
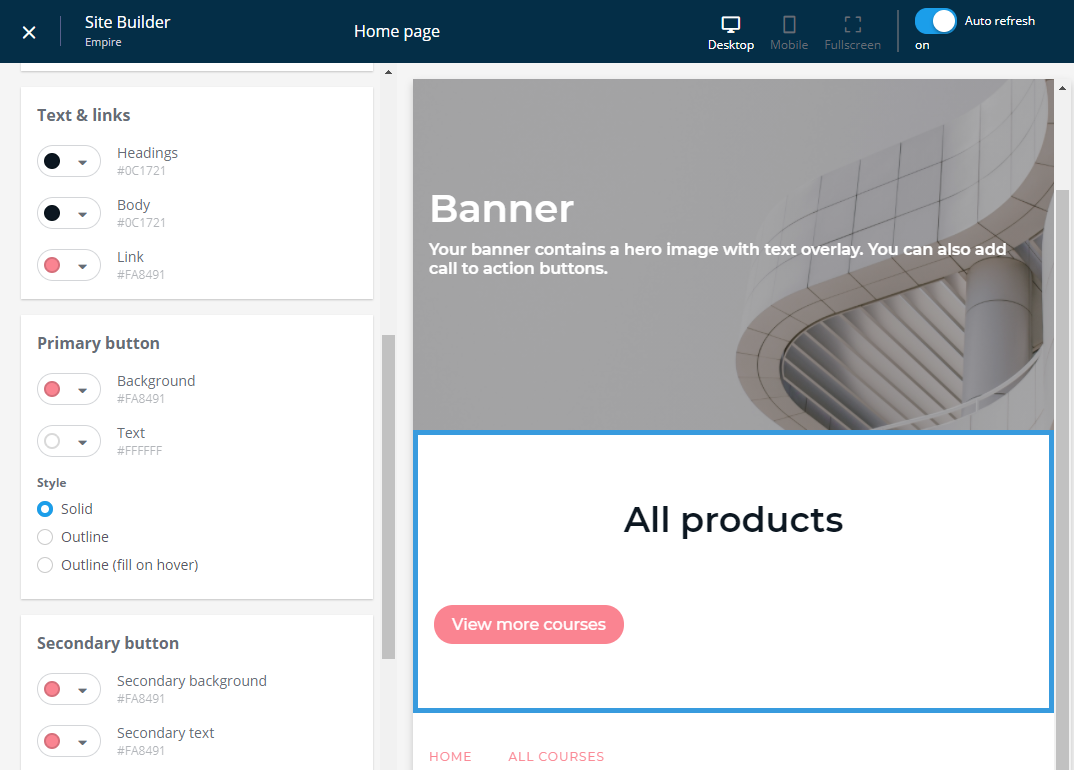
Theme settings allow you to update the look and feel of your site. You can adjust everything from header and footer colors to the background, change colors for text , links, buttons and the accent of your site.
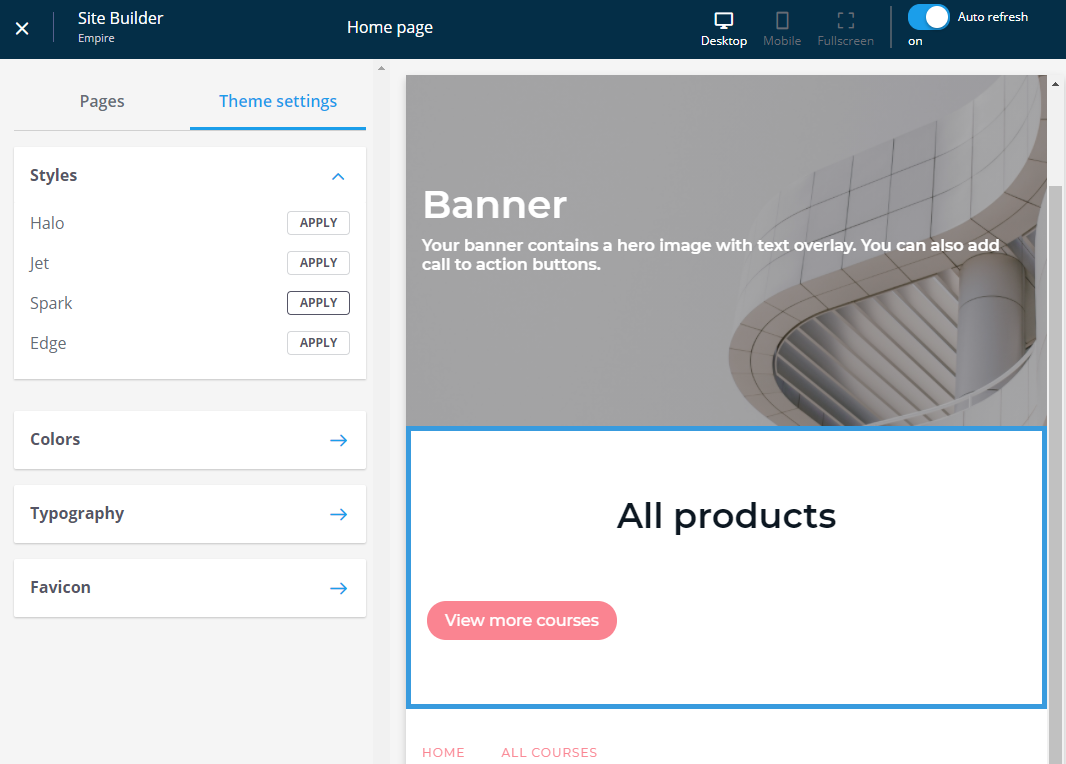
Thinkific has also given careful thought about the appearance of your site on various devices. Site Builder comes with a preview of your site in both desktop and mobile views, ensuring that students get the best possible experience as they learn about what you have to offer.
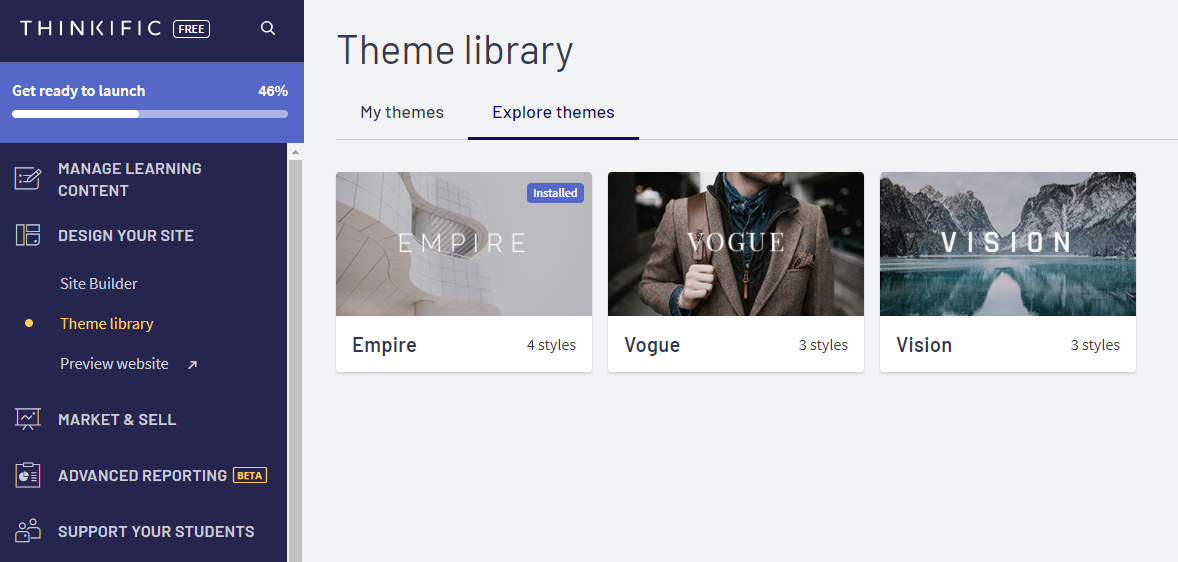
Theme Library
The Theme Library is where you'll find a collection of themes that can be added or used for your site. By default you'll have a preselected theme, and to see more click on the Explore themes tab at the top of your screen.
At a glance, it may appear as if Thinkific doesn't have much to offer in the line of themes. At the writing of this review, only three were available. But don't write off what they have just yet. Themes come with four styles that can be applied. Each style has a unique look and feel, color scheme, font styles and sizes, giving you loads to work with. And remember, everything you see in each theme is customizable.
Preview Your Site
The website preview feature opens a new browser tab where you can preview the front-end of your site. It will show every element you've added, created, or edited.
Market and Sell Your Course
A while ago, Thinkific was criticized by some for not having enough marketing tools and features to help instructors promote their courses. We’ve found that a lot has changed since then. Sure, Thinkific doesn’t offer a marketplace like Udemy, Teachable, or Skillshare, but then again not every online course platform does.
The Market and Sell section is where you'll find tools you can use to help promote and drive sales for your courses. Here's a look at what those are.
Coupons
Coupons are a universal concept. Thinkific allows you to build promotions and grow your audience using them. The Coupon feature is easy to use. Click on the New Coupon button to get started. You’ll need to give your coupon a name, set a quantity, set expiry date, assign a discount in dollars or a percentage, select which products it can be applied to (if not all), and then hit Save. You can update your coupon details at any stage.
We like the idea that you can automatically apply coupons to courses as part of your promotions on landing pages. All you need do is create a coupon, build your landing page, and add a coupon string to the end of your URL. If any of the sounds complicated, rest assured that Thinkific has an exhaustive knowledge base with easy-to-follow instructions that you can turn to.

Sales Widget
If the term "Sales Widget" sounds intriguing, that's because it is. Thinkific has created a sales widget which is a small, customizable button course card that can be added to any website or blog, allowing your courses to be purchased from that online asset. And this is one of the first of its kind. While most platforms offer affiliate programs (covered below), this level of innovation is clearly designed to help instructors sell more courses faster.
Orders
The Orders section of your dashboard is dedicated to storing information for all course orders made. Thinkific gives you a search field where you can locate students by email or name. You also get a date filter to help you quickly narrow down the time frame for your search.

Integrations
Integrations are a major part of running an online business today. No platform has everything built into it, and Thinkific has incorporated a collection of apps that work seamlessly. Applications are broken down into six categories. Integrations include the following categories and apps:
E-commerce
E-commerce apps include Stripe, PayPal, Shopify, and Stunning. As can tell, two of these are payment solutions with the exception of Stunning, an app that helps you recover failed or future payments from students by sending automated notifications so they update credit card information.
Shopify is one of the most interesting integrations. With it, you can add Thinkific courses directly to your Shopify store for sale. When a student purchases a course from your Shopify store, a Thinkific account is created automatically along with access details to their new course.
We think it’s a brilliant idea. Most entrepreneurs understand that multiple revenue streams create a greater financial stability. Being able to sell physical products and courses broadens revenue generation options, making it easier to reach your financial goals.
Automation Tools
Automation tools include triggers and actions from Zapier, and Infusionsoft gives you the opportunity of deeper and more sophisticated marketing functionality.
Analytics
Analytics apps include Google Analytic, Mixpanel, Facebook pixel, and Segment.io. With these, there’s a good chance you'll be able to track as many facets of your Thinkific course and generate data to help you improve it over time.
Email Marketing
Thinkific includes multiple email marketing solutions. You can choose from MailChimp, Constant Contact, ConvertKit, AWeber, and Active Campaign.
Student Access
Student access tools are more for communication. These include Zoom, Accredible (an app that offers digital certifications and badges), and Disqus.
Growth Tools
The growth tool section of Thinkific may appear slim, but you have access to Sumo. Sumo offers a collection of applications to help you to market your content and drive traffic. These include email captures, sharing buttons, and more.
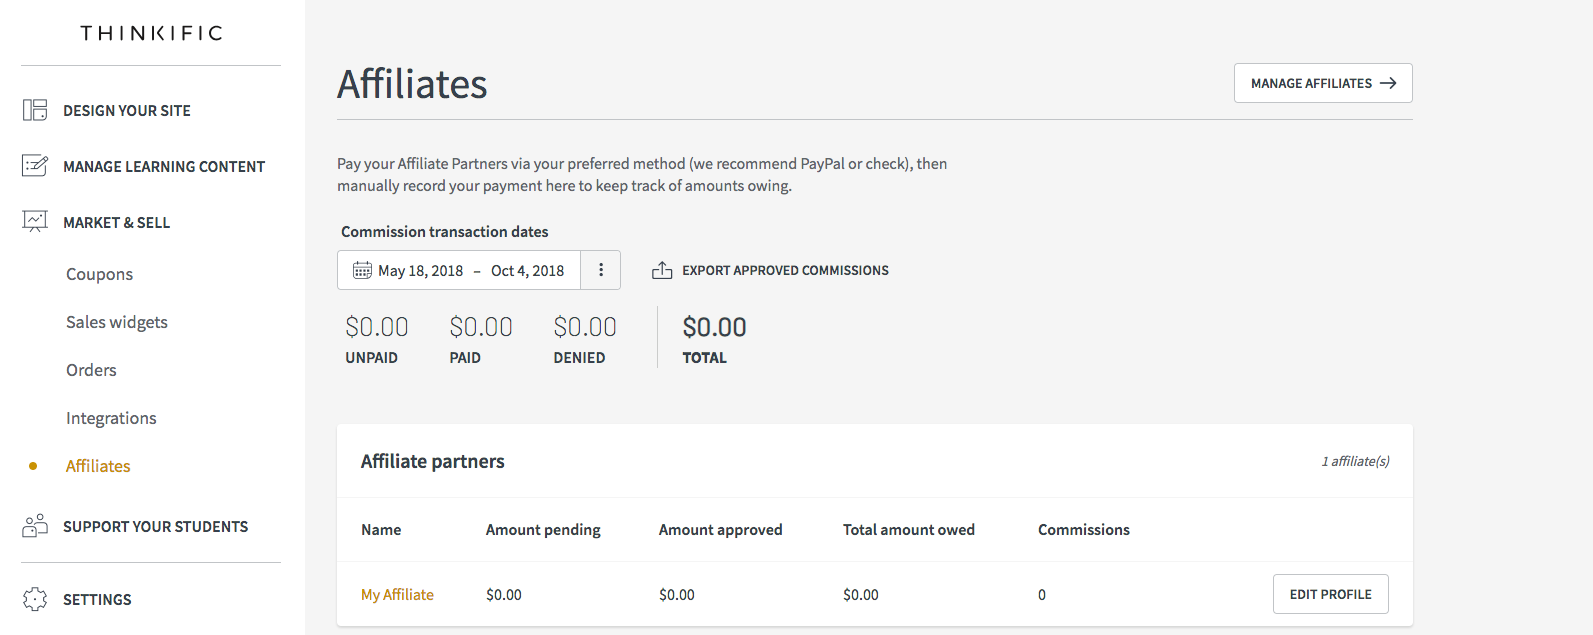
Affiliates
Affiliate programs are often a pain to set up. But as we've completed reviews of various platforms, we found that the online course platform market has risen to the occasion. Thinkific offers an affiliate section to all instructors. You can assign any affiliates to your account and provide them with unique links to drive traffic to your site. Cookies last for 30 days and affiliates gain revenue for courses or bundles that you select.
While Thinkific does a great job of tracking who sent you business, it doesn't manage actual payouts. This is the responsibility of the school owner. The affiliate dashboard does, however, allow you to record payments you’ve processed.
Advanced Reporting
Advanced Reporting offers tons of valuable data. It's designed to give you insights on revenue generated, student enrollments and engagement, and orders. It's broken into these four subsections.
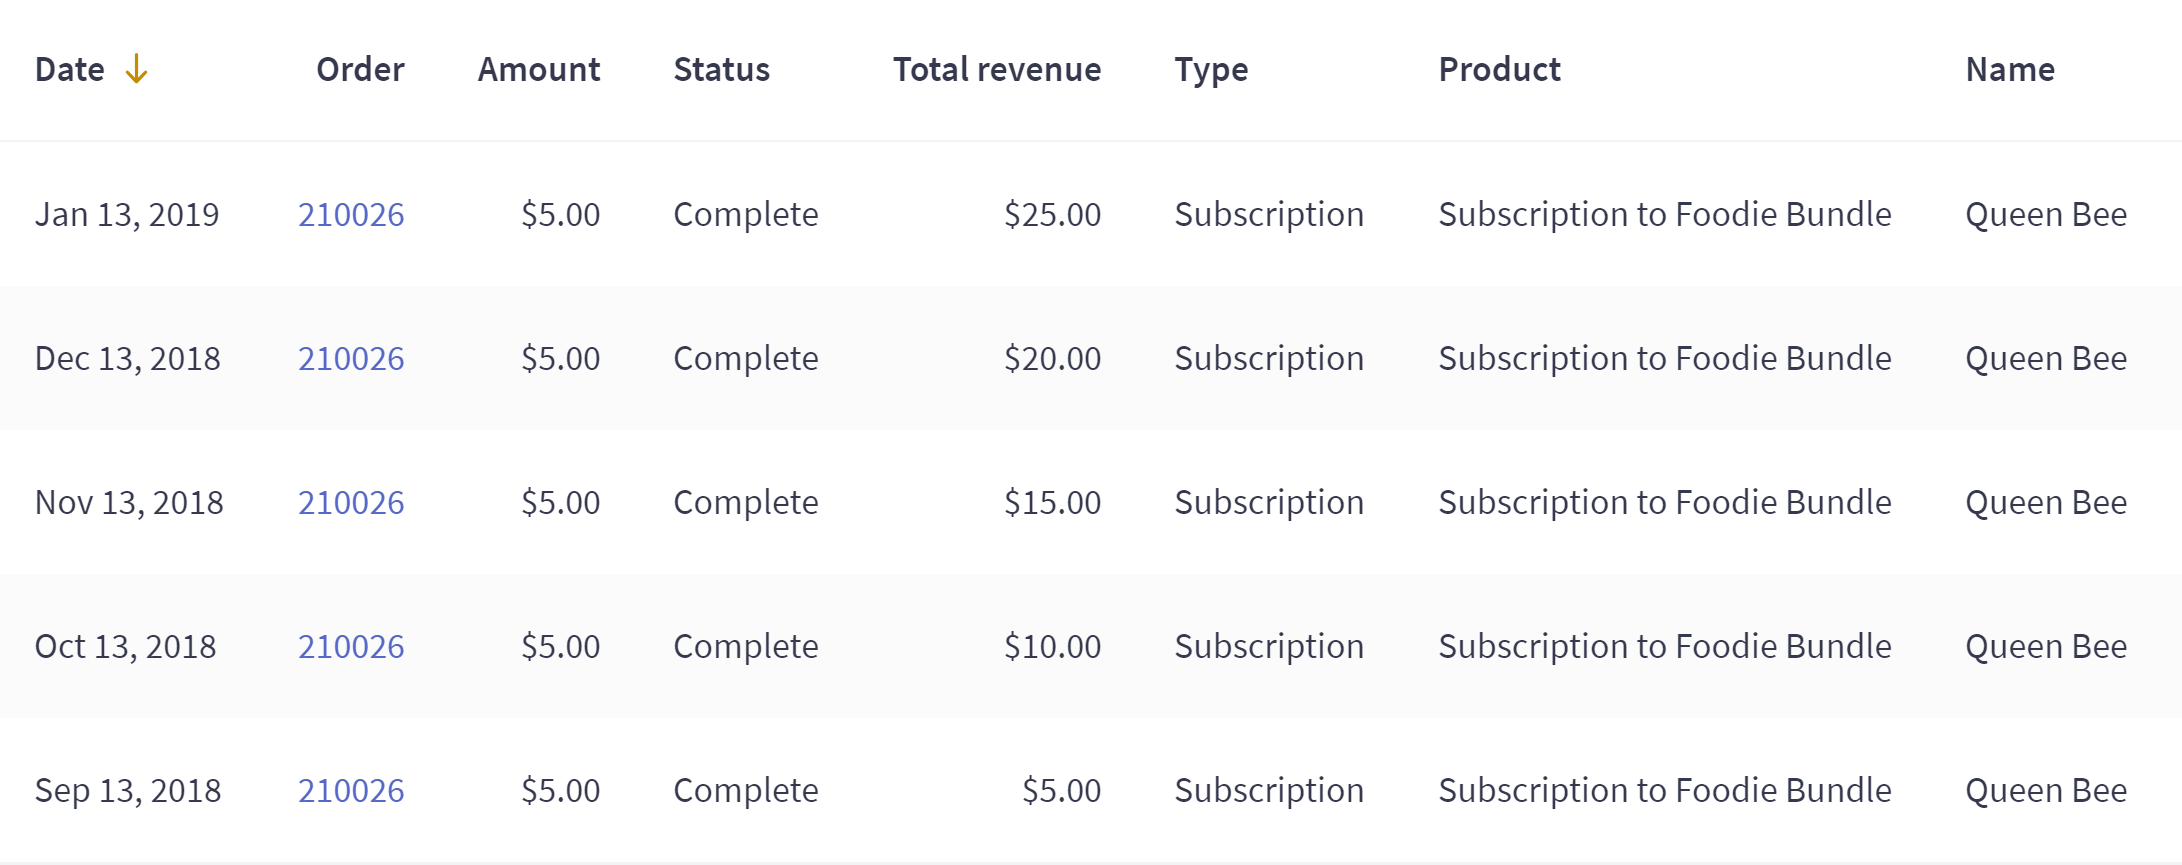
Revenue
Revenue records all the revenue generated to date. You're able to alter revenue by product name, product type (bundle or course), payment provider, and payment type. And if you like to drill down deeper, the details tab at the top you screen allows you to use the same filters and presents a list of all information you're looking for.
Orders
Orders show courses ordered to date. You can also track which courses were purchased using coupons, by product type, by returning students, payment type, and affiliate source.
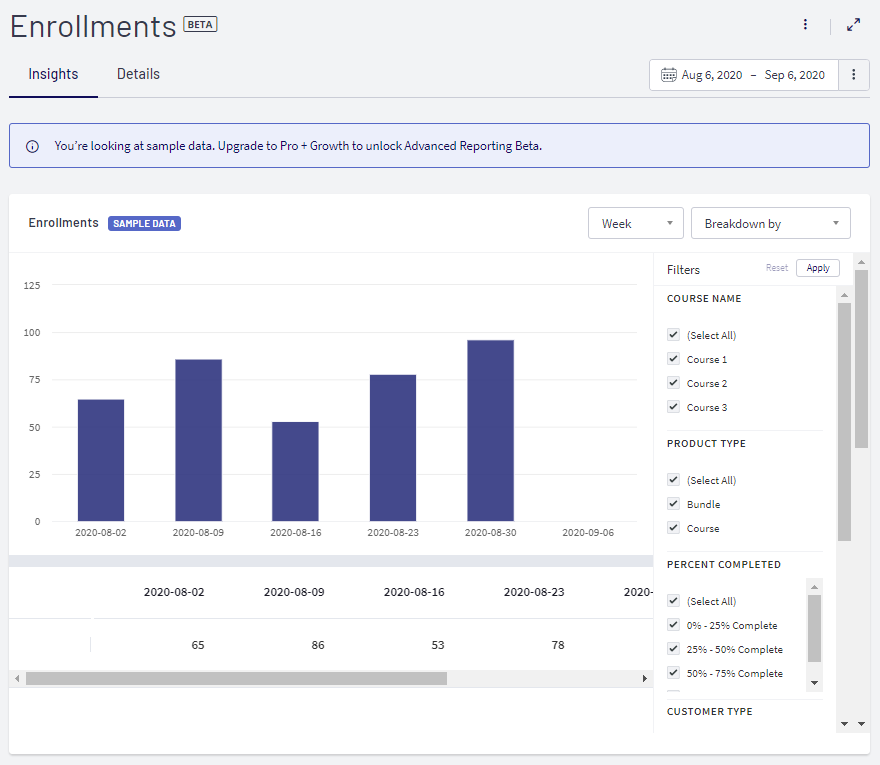
Enrollments
Enrollments offer a breakdown of course sign-ups by course name, product type, percentage complete, new versus repeat student enrollments, and by group (more on this later). Enrollments also provide access to course name, product type, percentage completed, customer type, and group name filters.
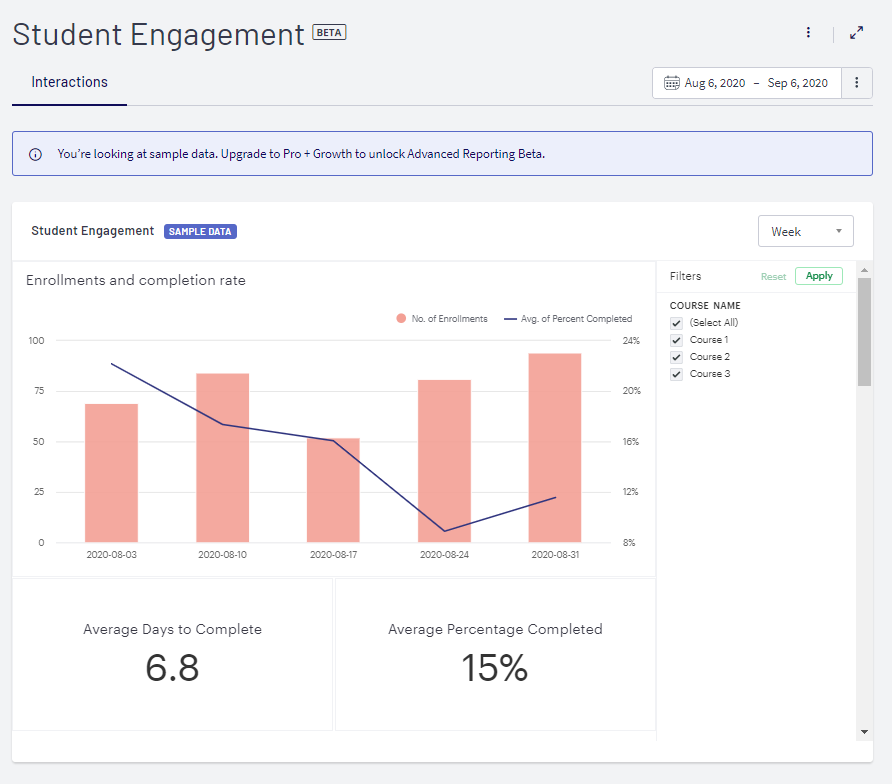
Student Engagement
Student Engagement provides an overview of how well students fair with your courses. You get a graph that indicates the number of student enrollments and completion rates over time. Here, you can filter by course name and break it down into hour, day, week, month, and quarter time frames. You also get a snapshot of lesson statistics. These numbers are visualized as a series of graphs that indicate the number of lessons viewed and completed, along with the various types of content you provided (think downloads, multimedia, PDFs, quizzes, text, and video), quiz attempts, and reviews received.
Students Support
One of the biggest challenges of starting and growing a community in the online learning space is being able to track your success.. To do this you'll need a collection of smart tools that come together to give the kind of insights and access to information about your performance as and when needed. Thinkific’s solution is the collection of smart features.
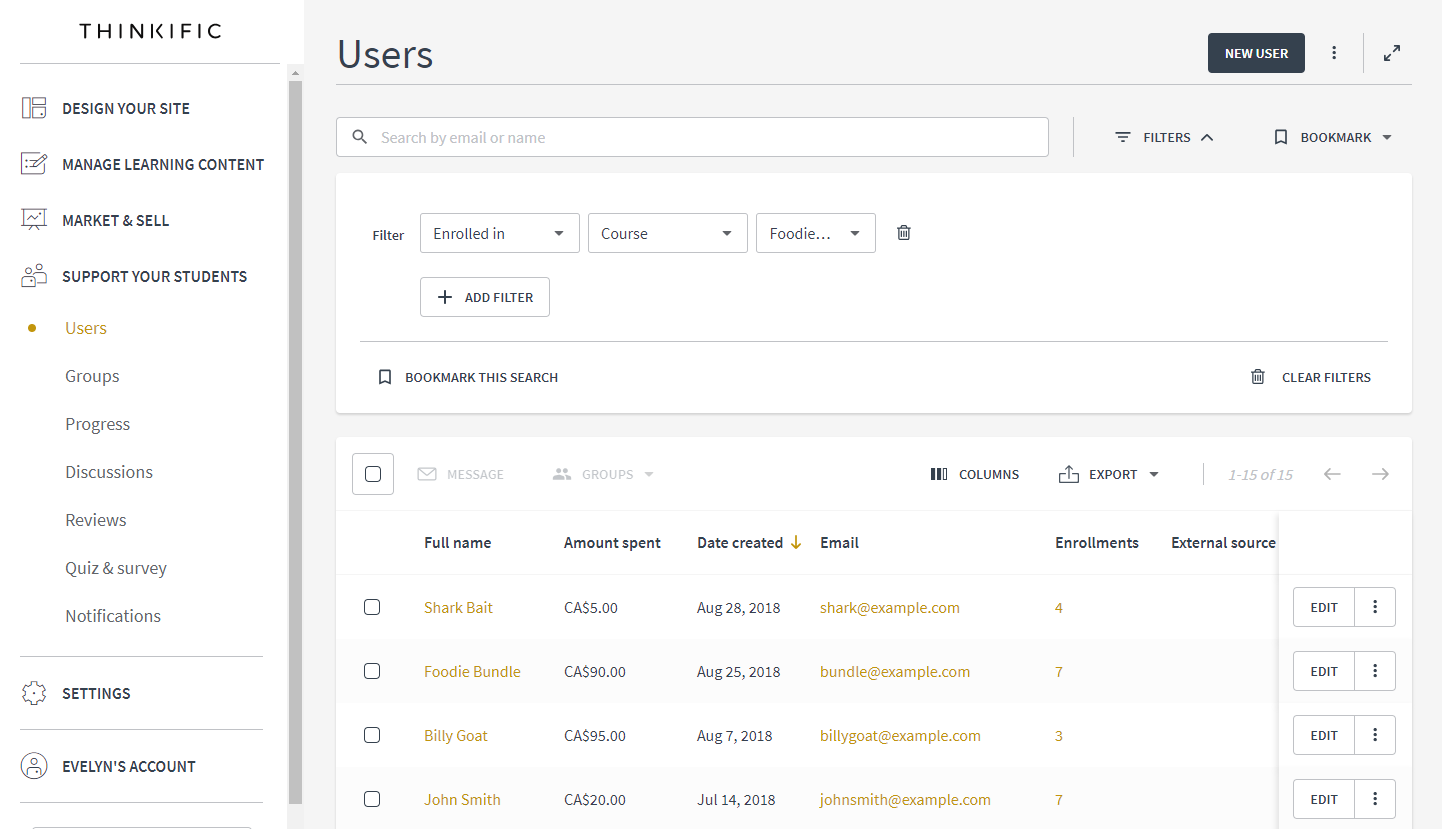
Users
The Users tab help you organize, segment, analyze, and stay in contact with students through email marketing messaging. To access all of this functionality, you'll need to upgrade to the Pro plus plan with the Growth package. You'll be able to start picking apart and better managing the finer details of running a successful online course and school.
Groups
Groups is one of the smartest additions to Thinkific. If you're familiar with Udemy for Business, Groups make sense. It allows you to sell courses to organizations. Groups also comes with some amazing functionality. Take the team-based tracking feature. It helps you track and compare groups within an organization. For example, if you can to track your sales team versus your customer support team. You can do that and quickly and easily tell how well they are progressing with your courses.
Internal Organization and Tracking helps you organize your groups when performing tasks like student imports and bulk enrollments.

Progress
The Progress area is where you'll track how well students are moving through your course content. You have access to three types of reports. These are:
Progress
You're able to track when students started a course, completed it, last signed in, and even tell how what viewer and completion rates are for your courses.

Cohort Reports
Cohort Reports are a little more sophisticated but really helpful. They help you compare student completion rates by grouping students. You can, for example, build a cohort based on the month when a group of students enrolled, and compare it to a previous month of student enrollments. By creating two cohorts, you can examine how well each group is taken to your content and possibly spot similarities or differences in how your course was received.
Group Reports
Group Reports are like Progress Reports, but show information on the progress of a group which you can create. In group reports you can see unique student information and still tell how well students are taking to your course by tracking the same metrics in Progress Reports.
Communities
The Communities feature is one of the smartest and most valuable instructors have access to on Thinkific. It helps you build a community of students around your brand, giving it the potential to scale.
With Communities, each community you create gets a dedicated page for students to create posts, and view and comment on content from other students. Creating your community is as simple as clicking on the New Community button and following the basic set up process.
An important note: while you can create a community for each course you offer, remember to keep communities separate from discussions about course content. As you’ll see below, there is a Discussion feature built into Thinkific where all course related content can be discussed.

Certificates
Certificates, we believe, should be a staple for every course. Not all certificates created by instructors will be backed by an accredited authority, but they're a great tool for motivating and rewarding students upon completion of your course. Thinkific makes it really easy to create certificates.
All you need do is select a template, customize it, and assign it to your course. You're also able to access certificates for students, edit them, view a certificate history, and re-issue certificates if need be.
Discussions
The Discussions areas where you'll be able to enable discussions for each lesson for your course. Students can add images to discussions and also upload files. The Discussion page also allows you to store or search for them in the search bar. And if you find that a specific topic has been addressed and is no longer relevant, you can hide it through your admin dashboard.
As comments and questions come in for a course, you can set up email notifications to never miss a beat. To respond to discussions, simply access your admin panel and head to the Discussion section.

Reviews
Reviews are an important part of gauging how effective your courses are and also very telling for prospective students. Thinkific gives you the option of enabling reviews for each course, and students can review (out of five stars) your course after each lesson. When reviews are created, you can access them through the Reviews area in your admin dashboard. You can approve individual or all reviews, and edit them.
Editing reviews doesn't sound the most ethical thing to do but can be helpful when you want to correct typos and grammatical errors.
Another helpful feature that comes with Reviews is the ability to pull them into your site builder when you're creating your sales page. All you need do is add a Course Review block, make a course selection, and then choose the review you'd like to add.


Assignments
Assignments are a great way to engage students. They help test how well students have grasped new knowledge and consumed course content. Creating them is easy. Assignments are created in the Curriculum area while building out your course. You can upload an assignment lesson, and once created, students will be able to download, and submit their assignments through their accounts.

In your backend, you can create a notification for when students submit assignments. In your admin dashboard, you can download student assignments, reply with messages, and approve or reject submissions.
Quiz and Survey
The Quiz and Survey area is where you'll find all submissions for both. You'll see whether students have submitted a quiz or a survey, and the related course. Other details include the passing grade for a quiz, the grade a student received, the total number of questions asked, and how many quizzes a student submitted. If you need to pull this data from Thinkific, you can export it in a CSV file.
Notifications
The Notifications area is where you'll choose which notifications you want to receive. You get two tabs. The first, Admin notifications, allows you to control sign-ups and subscriptions, and student engagement notifications. The Student notifications tab allows you to control settings for when students receive messages. These include site welcome, weekly reminder, discussion replies, and receipts. Student notifications also include the ability to enable or disable welcome emails for specific courses, and notifications upon the completion of a course.
Your Settings Area
The Settings area includes all important backend elements. You'll find an area to update your site details by changing your site name, update your email addresses for both replies to and support emails, move your site from Thinkific's subdomain onto a custom URL, add an SSL certificate, and if you're on a free plan, you'll also be able to upgrade and remove Thinkific's branding. You can also customize pre-order, available now, lessons, courses, and start learning text.
Getting Help from Thinkific
Support is a big deal. The amount of access you have to support can determine how quickly you are able to create your course and generate revenue. Thinkific offers a collection of tools to help instructors get going as soon as possible. For example, on the Pro, Growth, Premier, and Plus plans, you've access to priority support which includes telephonic support. However, to reach out to the Thinkific team, you need to submit a ticket. Their site also states that email support has a turnaround time of five hours.
Help Center
Thinkific’s help center is likely where you'll spend most of your time looking for any questions about how the platform works. And it's helpful. You'll have access to a collection of demos, insightful articles, and everything you'll need to launch your course.
Training
Thinkific has done a really great job of building a powerful training center. If you recall, the onboarding program right at the beginning of this Thinkific review hinted at access to training, and you'll be pleasantly surprised to see just how much of it you get. Thinkific's fast-track course is designed to help you create and sell your first course in record time.
You also have access to courses with anything from 14 to 45 lessons. Some courses are free, while others come at a premium and cover topics like creating a master class, how to find the right price for your online course, or how to leverage student engagement to drive impact and revenue.
Expert Marketplace
While Thinkific has done a great job of creating as many helpful resources as possible to help you create your course and site, it also offers the Expert Marketplace. It's where you can go to get help with publishing your course, designing your site, enrolling students, and customizing your course.

Thinkific Pros and Cons
Pros
- Can create multiple courses
- Keep all revenue from course sales on all plans above the Free plan.
- Free plan is feature-rich
- Offers drip content
- Can create quizzes and assignments
- Comprehensive student engagement tools
- Provides certificates of completion
- Marketing tools available
- Includes integrations
- Telephone support for all plans above Basic
- Includes an Expert Marketplace for help from Thinkific pros to build your course
- Access to comprehensive help center
- Offers training courses (free and premium)
Cons
- Only offers four site themes
- Marketing and sales can be improved to allow for the creation of funnels
- No course accreditation
- Limited third-party app integrations
- A five-hour wait time for email support is long and can delay course creation
Key Takeaways for Instructors
Most products claim to be the best in the market, and while we can commit to Thinkific being the best, it truly is up there with the best. It really offers everything instructors need to build amazing courses, market, sell, and manage them. This Thinkific review explores all facets of what you get when you choose Thinkific, and as you can tell, it really is built by people who understand what instructors need and also what students want out of learning experience.
We love the fact that Thinkific offers as many features as they do. Including smart additions like the sales widget and the option of selling courses from a Shopify site helps quicken sales. And when it comes to support, while you may not get telephonic support, Thinkific’s help center is packed with tons of valuable information on how to do anything with the platform. Some may see the lack of a Thinkific app as a con, while it is, it’s not a deal-breaker. Every site designed is automatically responsive.
Thinkific Rating
Thinkific is a powerful course creation platform. We think it's a best-of-breed solution for anyone looking to create their first course or roll out their next. It has everything you'll need to produce a high-quality course in the shortest possible time. While you may find the limited number of themes a little restrictive, they are highly customizable. We think that Thinkific is one of the easiest-to-use options and it’s well worth building your next course on this platform.
Frequently Asked Questions
Does Thinkific have an affiliate program?
Yes. Thinkific’s affiliate program is available to instructors only and controlled directly through the instructor admin dashboard.
What type of Thinkific integrations are available?
In this Thinkific review, we've covered all integrations the platform offers under the integrations subheading above. In short, Thinkific offers integrations for e-commerce, automation tools, analytics, email marketing, student access, and growth tools.
Does Thinkific integrate with Active Campaign?
Yes. Thinkific offers an Active Campaign integration that is available under the Market and Sell section in the instructor dashboard.
Are there Thinkific course examples?
Finding a complete course example from Thinkific is a little challenging. Access to courses often requires a sign-up. To get a look at what courses can look like, we recommend signing up for a free account with Thinkific and going through the example in your admin dashboard. It includes the entire experience and gives you all the insight you need. Also, be sure to check out the Courses and Managing Learning Content sections of this Thinkific review.
Does Thinkific offer a free plan?
Yes. Thinkific offers a free plan that allows you to test drive the platform. With it, you can create three courses, enroll unlimited students, offer quizzes and surveys, upload video, audio, and PDFs, and get paid through the platform. As this is a free plan, you are charged a 10% transaction fee.
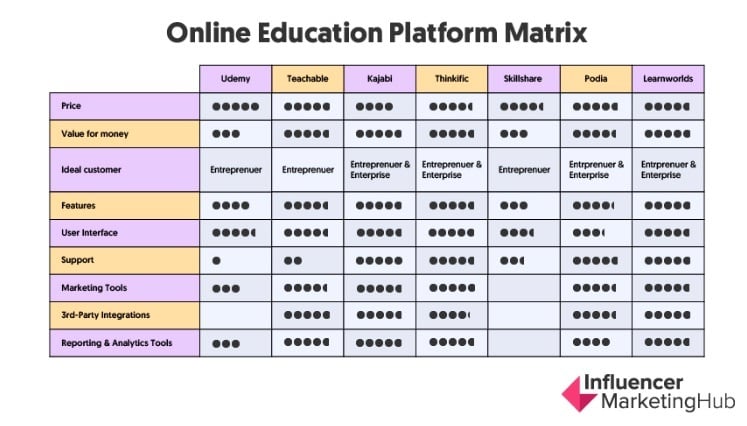
Who are Thinkific’s competitors?
Thinkific as many competitors. These include Teachable, Kajabi, Udemy, LearnWorlds, Podia, Skillshare, and more.
Thinkific vs Teachable: which is better?
When comparing Thinkific to Teachable, our experience has seen Thinkific offer more functionality and features designed to quickly help instructors create courses. Thinkific offers a robust platform with advanced reporting that’s a little more granular than Teachable’s. It also offers the ability to sell to organizations, and multiple ways to engage with students. Thinkific also offers more themes and layouts where teachable offers just one. Read our complete Teachable review for more. Thinkific's comparable Basic plan starts at around $40/mo. Choosing between Thinkific and LearnDash really depends on your experience with building online courses. If the idea of creating a standalone WordPress website seems a little daunting, and you'd rather not part with $150 upfront, using Thinkific's free plan would be a good idea to get your feet wet and later upgrade.
Thinkific vs Kajabi: which is better?
Thinkific and Kajabi are both powerful platforms. Kajabi offers more integrations, templates, and marketing tools like sales funnels and landing pages, where Thinkific only offers a site builder with customizable themes and pages.
While both platforms offer student progress tracking, Kajabi includes powerful analytics and reporting. While you have the option of integrating various email providers, Kajabi offers a complete email marketing platform directly through your admin dashboard. Read our complete Kajabi review for details.
Thinkific vs Podia: which is better?
Podia and Thinkific offer very similar experiences and tools to help instructors build courses. For an in-depth look at what Podia has to offer, read our complete Podia review.
Thinkific vs WordPress: which is better?
Thinkific and WordPress may seem like similar platforms, but there are many differences. Firstly, WordPress is typically used as a standalone platform. You can create a website, and through the help of plug-ins (like LearnDash) add additional functionality like the ability to offer courses. WordPress, unlike Thinkific, also relies on a certain degree of coding knowledge to customize and troubleshoot. While you can get a WordPress theme that may be easy to customize, as a standalone platform, support is challenging to source. Thinkific, on the other hand, is backed by support. You also get tons of instructional material on how to build your course. Building your website is simple and can be done in a matter of clicks, without the need of coding knowledge. Integrations are also easy to manage and backed by support.
Thinkific vs LearnDash: which is better?
LearnDash is a WordPress learning management system or LMS. It's designed to integrate with WordPress websites to help education and professional training institutions deliver courses. LearnDash comes with support but may require a little more time to get used to than Thinkific. As a WordPress plug-in, you'll need to be comfortable with WordPress to understand how these components work together. LearnDash pricing is annual and starts at around $160/yr for their Basic package.
Thinkific vs LearnWorlds: which is better?
LearnWorlds and Thinkific offer very similar experiences and tools to help instructors build, markte and sell courses. For an in-depth look at what LearnWorlds has to offer, read our complete Learnworlds review.
Thinkific Review
-
Features
-
Support
-
Value for Money